
Fast Robots - Lab 3: Time of Flight Sensors
Prelab
I2C Sensor Address
The VL53L1X ToF sensor operates using the I2C protocol. The default I2C address is 0x29. Since both sensors share this address, I will enable/disable the sensors using their shutdown pins.
Sensor Placement and Obstacle Avoidance
The ToF sensors will be placed at the front and side or front and rear of the vehicle depending on the intended outcome. I have decided to use the longer wires to connect the TOF sensors to my Qwiic Multiport Connector so I may have more flexibility in future labs.
Wiring Diagram
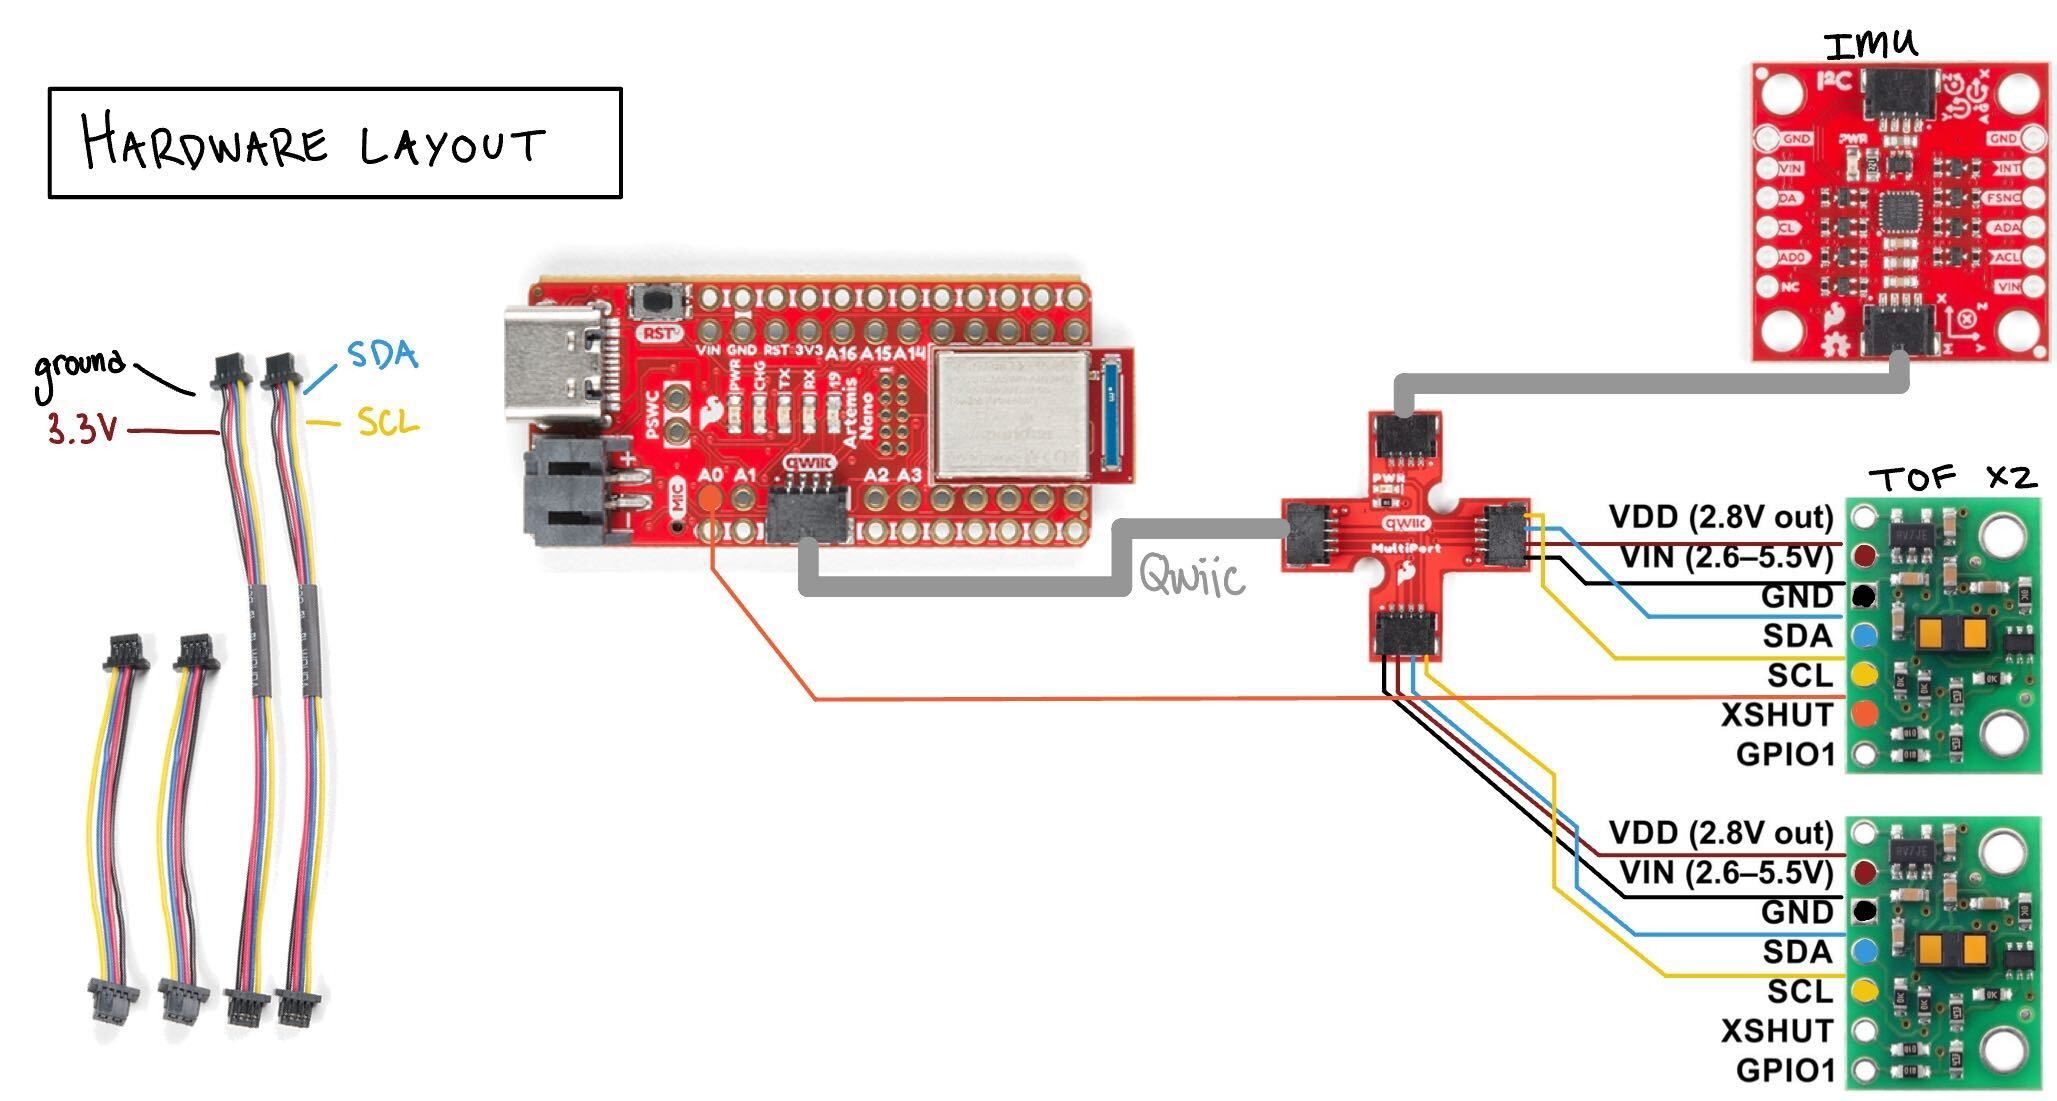
Figure 1: Diagram showing the wiring of the Artemis board with two ToF sensors and a QWIIC breakout board.
Lab Tasks
Soldering Connections
After deciding my layout, I soldered new connections for my battery, ToF Sensors, and Qwiic wires.
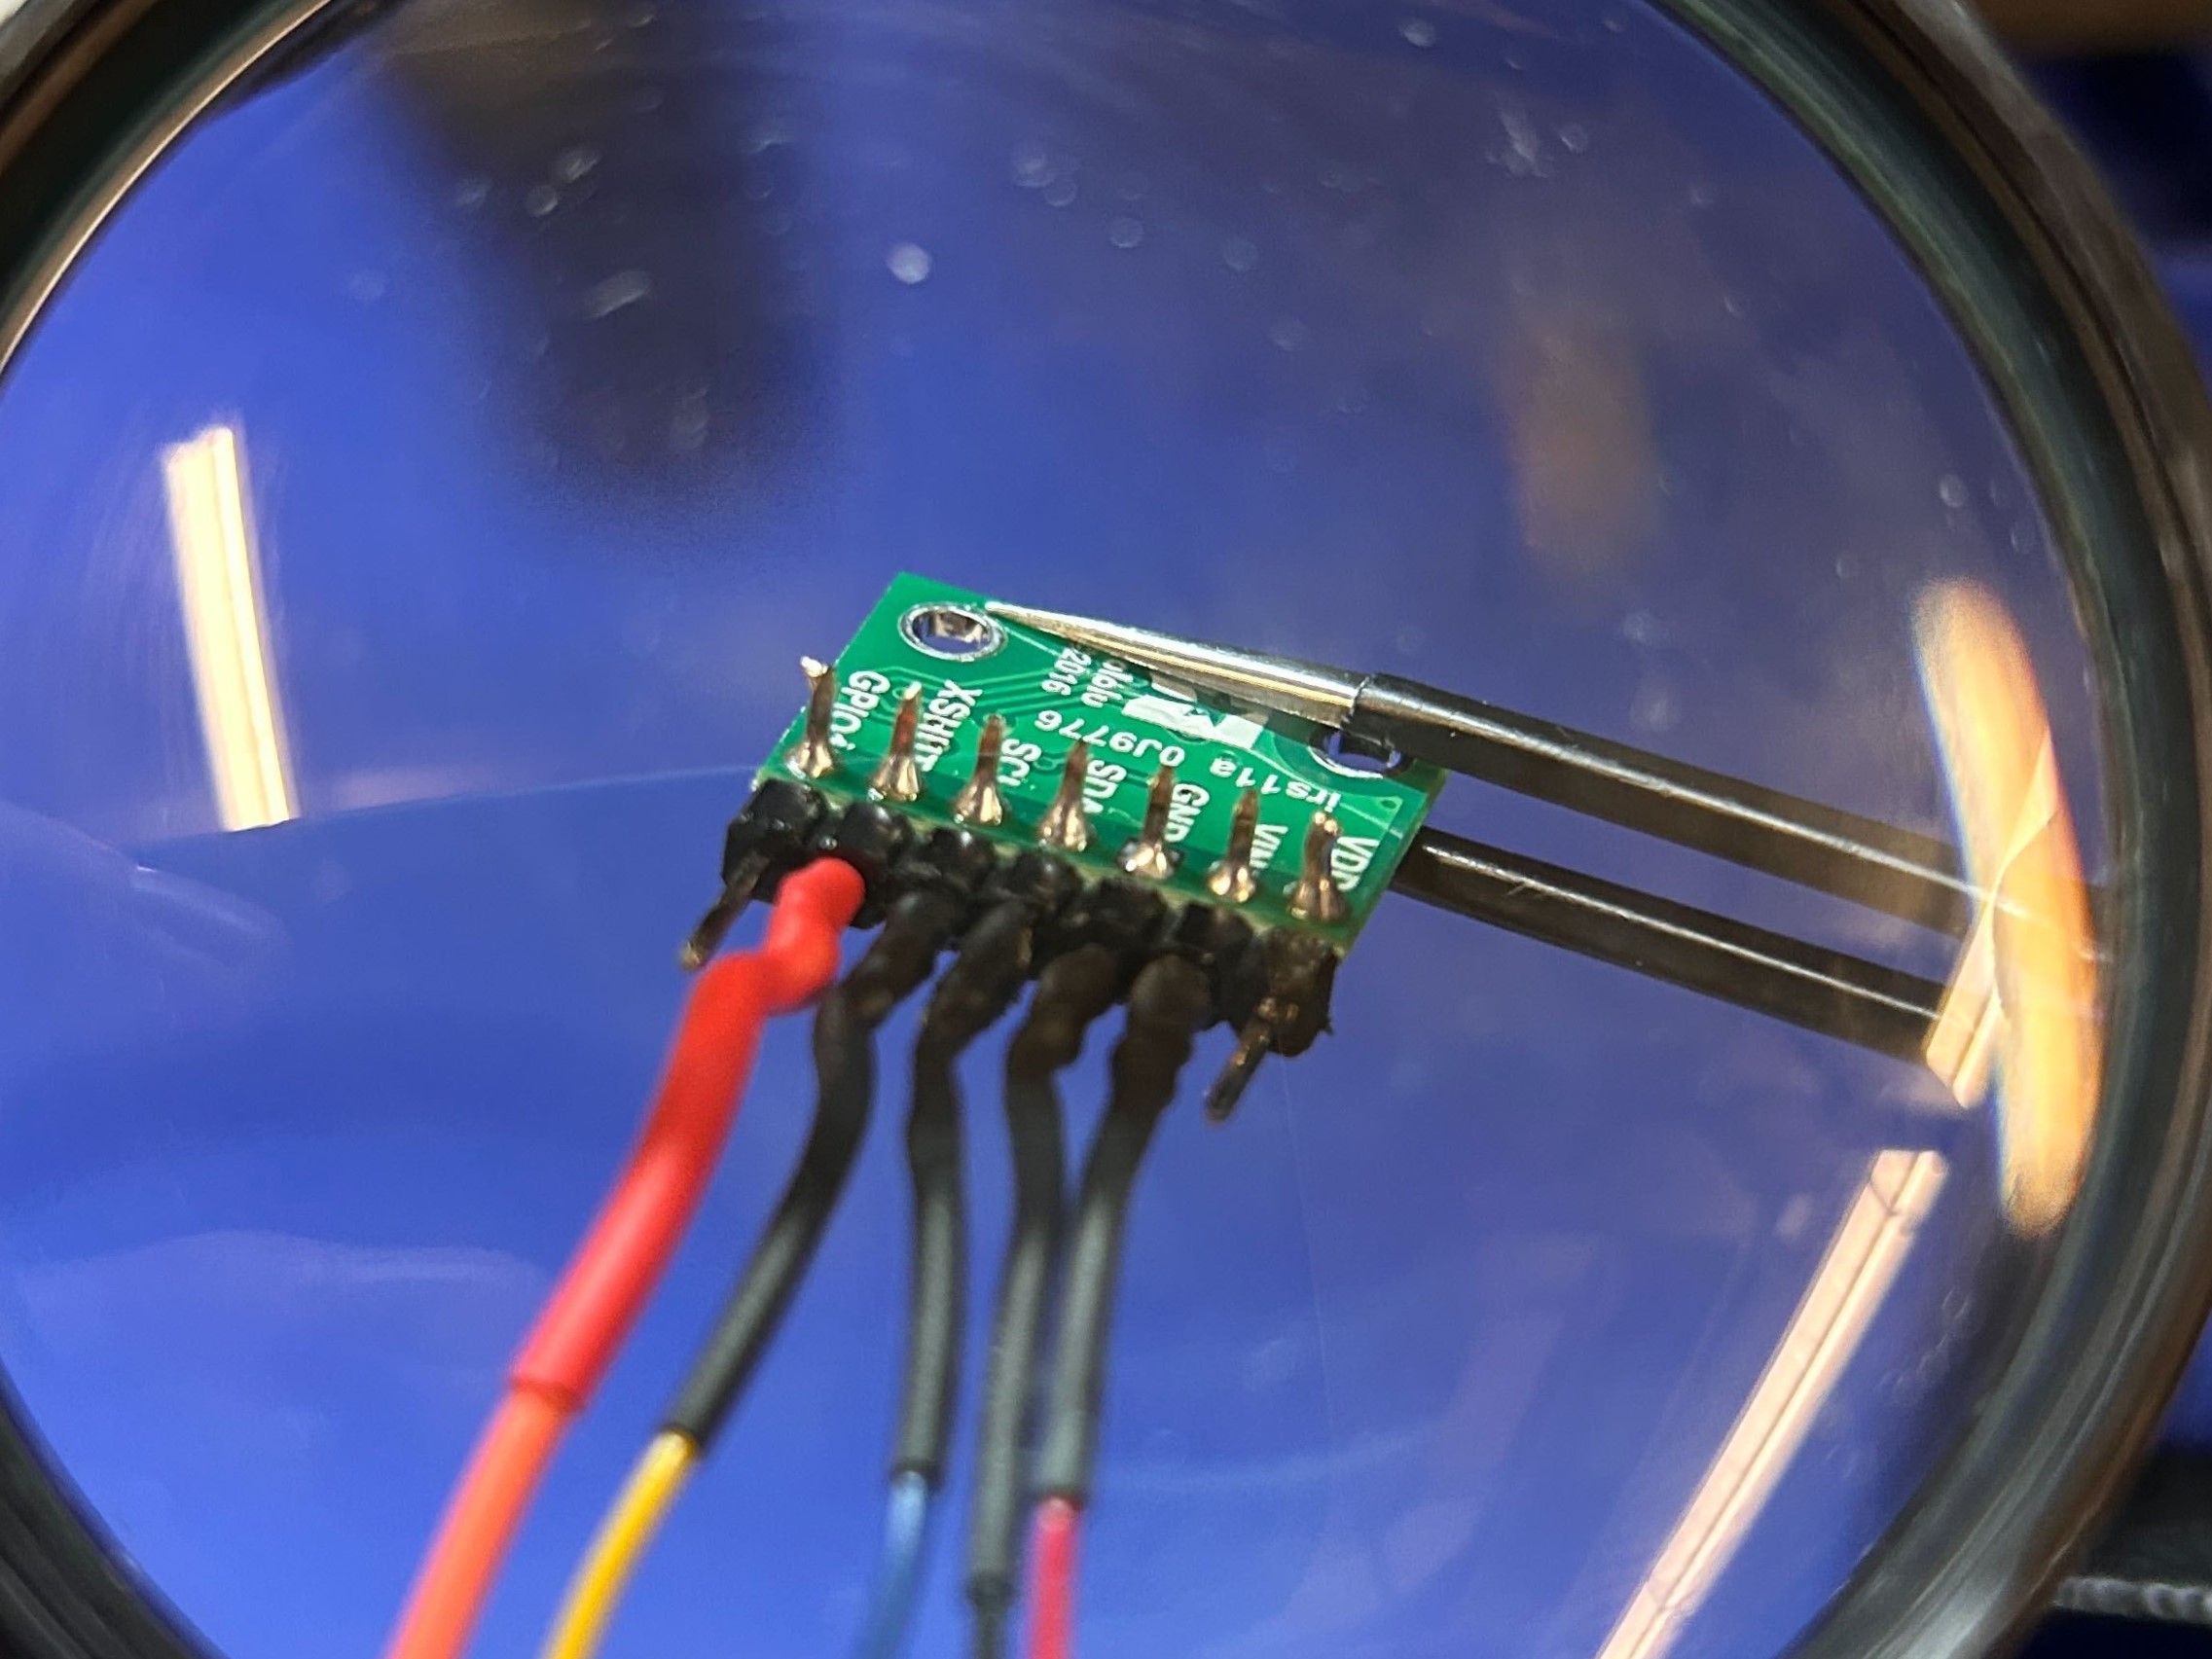
Figure 2: Photo of header pins and Wires soldered to TOF Sensor
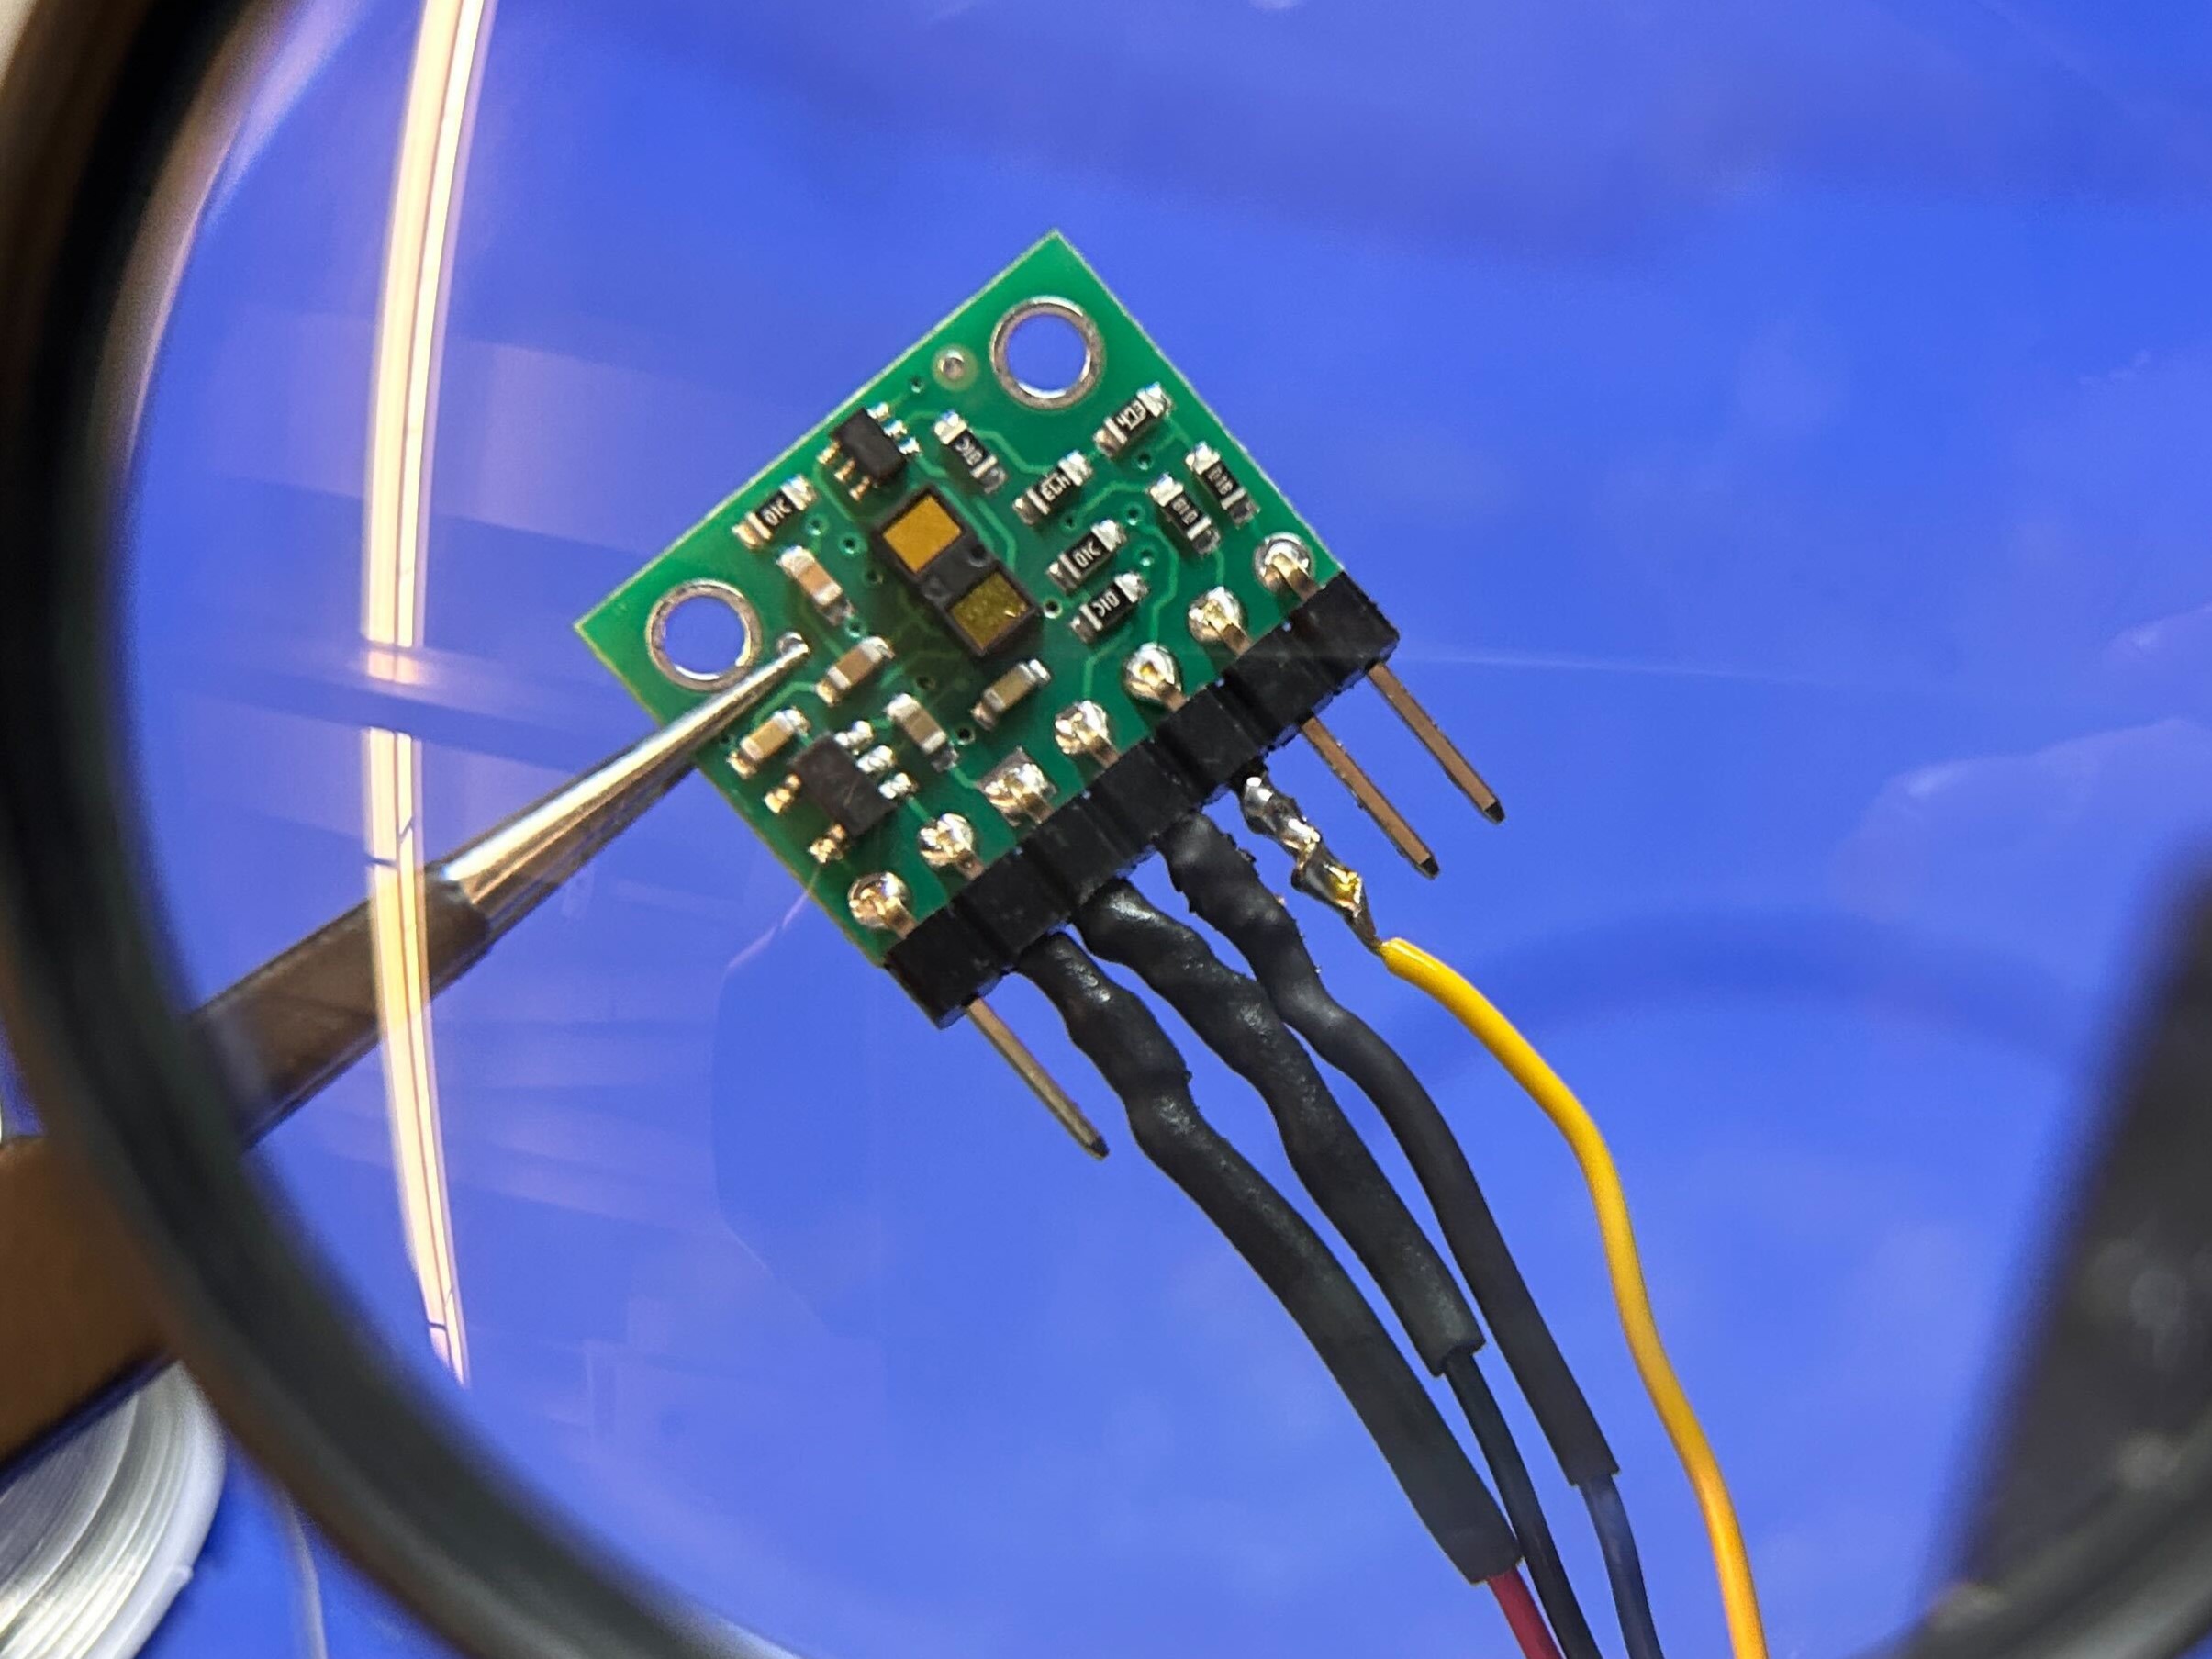 Figure 3: Photo of header pins and Qwiic Wires soldered joint prior to covering in heat shrink
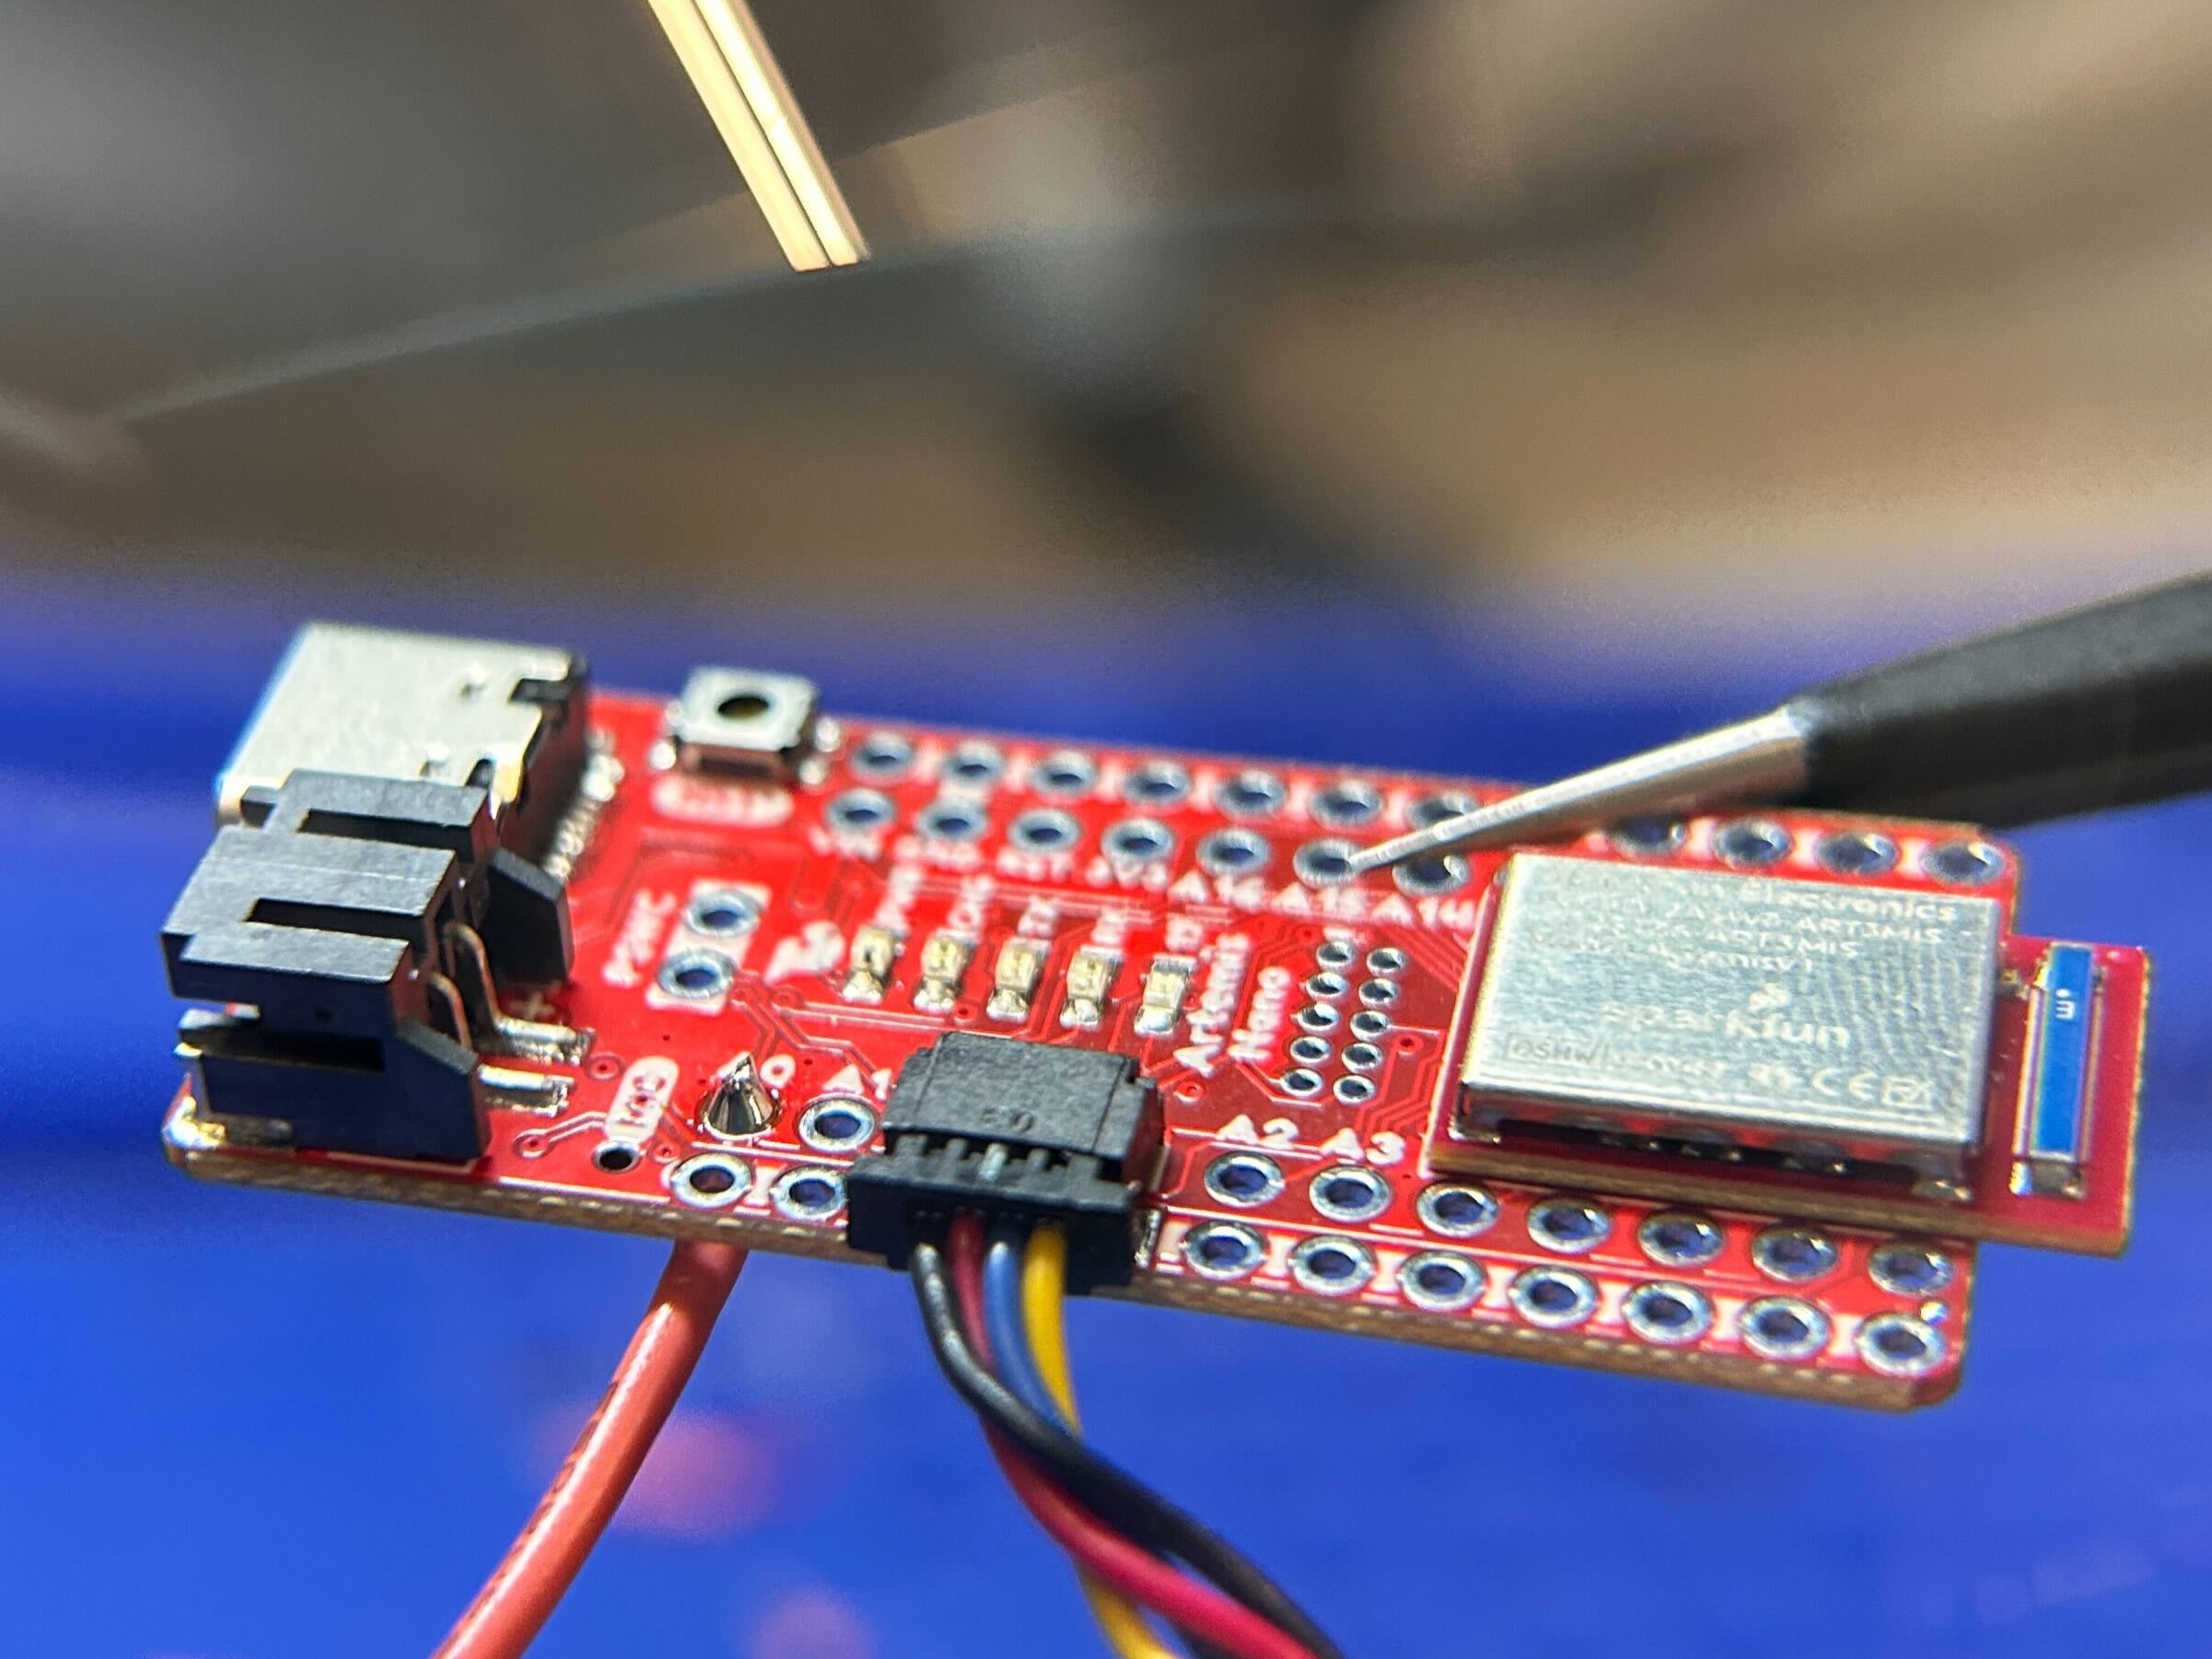 Figure 3: Photo of X-Shut Wire soldered to Artemis Nano Board
Connecting ToF Sensor to QWIIC Breakout Board

Figure 4: ToF sensors and IMU connected to the QWIIC breakout board using a modified QWIIC cable.
Scanning I2C Devices
To confirm communication with the ToF sensor, I scanned the I2C bus using the Artemis board. I used the Wire I2C example code.
#include "Wire.h"

void testPortI2C(TwoWire &i2c);

// This thread will create its own MbedI2C object using IOM pins
// Define your own pins below to try it
//#define mySDA D25
//#define mySCL D27
#if (defined mySDA) && (defined mySCL)
TwoWire myWire(mySDA, mySCL);
#endif

void testPortI2C(TwoWire &i2c){
  Serial.printf("Scanning... (port: 0x%08X), time (ms): %d\n", (uint32_t)&i2c, millis());
  uint8_t detected = 0;
  for(uint8_t addr = 1; addr < 127; addr++ ){
    // use endTransmission to determine if a device is present at address
    i2c.beginTransmission(addr);
    uint8_t retval = i2c.endTransmission();

    if(retval == 0){
      Serial.printf("\t0x%02X detected\n", addr);
      detected++;
    }
  }
  if(!detected){
    Serial.printf("\tNo device detected!\n");
  }
  Serial.println();
}

void setup() {
  Serial.begin(115200);
  Serial.println("Apollo3 - I2C");

  pinMode(LED_BUILTIN, OUTPUT);

#if VARIANT_WIRE_INTFCS > 0
  Wire.begin();
#endif
#if VARIANT_WIRE_INTFCS > 1
  Wire1.begin();
#endif
#if (defined mySDA) && (defined mySCL)
   myWire.begin();
#endif
}

void loop() {
#if VARIANT_WIRE_INTFCS > 0
  testPortI2C(Wire);
#endif
#if VARIANT_WIRE_INTFCS > 1
  testPortI2C(Wire1);
#endif
#if (defined mySDA) && (defined mySCL)
   testPortI2C(myWire);
#endif

  digitalWrite(LED_BUILTIN, LOW);
  delay(1000);
  digitalWrite(LED_BUILTIN, HIGH);
  delay(1000);
}
Code Snippet 1: Arduino code to scan and list all available I2C devices.

Figure 3: Screenshot showing the detected ToF sensor address (0x29) and IMU (0x69) nice
Since Both TOF Sensors have the same default address, I manually changed one of the addresses, by turning off one of the TOF sensors using the X-Shut Pin, rewriting one of the addresses, and then turning it back on.
#include <Wire.h>
#include "SparkFun_VL53L1X.h" //Click here to get the library: http://librarymanager/All#SparkFun_VL53L1X

//Optional interrupt and shutdown pins.
#define SHUTDOWN_PIN 0
#define INTERRUPT_PIN 3

SFEVL53L1X distanceSensor1;
SFEVL53L1X distanceSensor2;

//Uncomment the following line to use the optional shutdown and interrupt pins.
//SFEVL53L1X distanceSensor(Wire, SHUTDOWN_PIN, INTERRUPT_PIN);

void setup(void)
{
    Serial.begin(115200);

    Wire.begin();
    Wire.setClock(400000);


      pinMode(SHUTDOWN_PIN, OUTPUT);
      digitalWrite(SHUTDOWN_PIN,0);

      Wire.begin();

      distanceSensor1.init();

      //Shut down first sensor, change address
      distanceSensor1.setI2CAddress(0x54);

      if (distanceSensor1.begin() != 0) //Begin returns 0 on a good init
      {
      Serial.println("First sensor failed to begin...");
      while (1)
          ;
      }
      Serial.println("Sensor 1 online!");
      delay(1000);
      digitalWrite(SHUTDOWN_PIN,1);

      if (distanceSensor2.begin() != 0)  //Begin returns 0 on a good init
      {
      Serial.println("Second sensor failed to begin...");
      while (1)
          ;
      }
      Serial.println("Sensor 2 online!");

      distanceSensor1.setDistanceModeShort();
      distanceSensor2.setDistanceModeShort();
}

void loop(void)
{
    distanceSensor1.startRanging(); //Write configuration bytes to initiate measurement
    distanceSensor2.startRanging(); //Write configuration bytes to initiate measurement

    while (!distanceSensor1.checkForDataReady())
    {
      delay(1);
    }
    while (!distanceSensor2.checkForDataReady())
    {
      delay(1);
    }

    int distance1 = distanceSensor1.getDistance(); //Get the result of the measurement from the sensor
    distanceSensor1.clearInterrupt();
    distanceSensor1.stopRanging();
    int distance2 = distanceSensor2.getDistance(); //Get the result of the measurement from the sensor
    distanceSensor2.clearInterrupt();
    distanceSensor2.stopRanging();

    Serial.print("Distance1(mm): ");
    Serial.print(distance1);
    Serial.print(" Distance2(mm): ");
    Serial.print(distance2);

    float distanceInches1 = distance1 * 0.0393701;
    float distanceFeet1 = distanceInches1 / 12.0;

    float distanceInches2 = distance2 * 0.0393701;
    float distanceFeet2 = distanceInches2 / 12.0;

    Serial.print("\tDistance(ft): ");
    Serial.print(distanceFeet1, 2);


    Serial.print("\tDistance(ft): ");
    Serial.print(distanceFeet2, 2);

    Serial.println();
}
Code Snippet 2: Arduino code to scan and list distances read by both ToF sensors
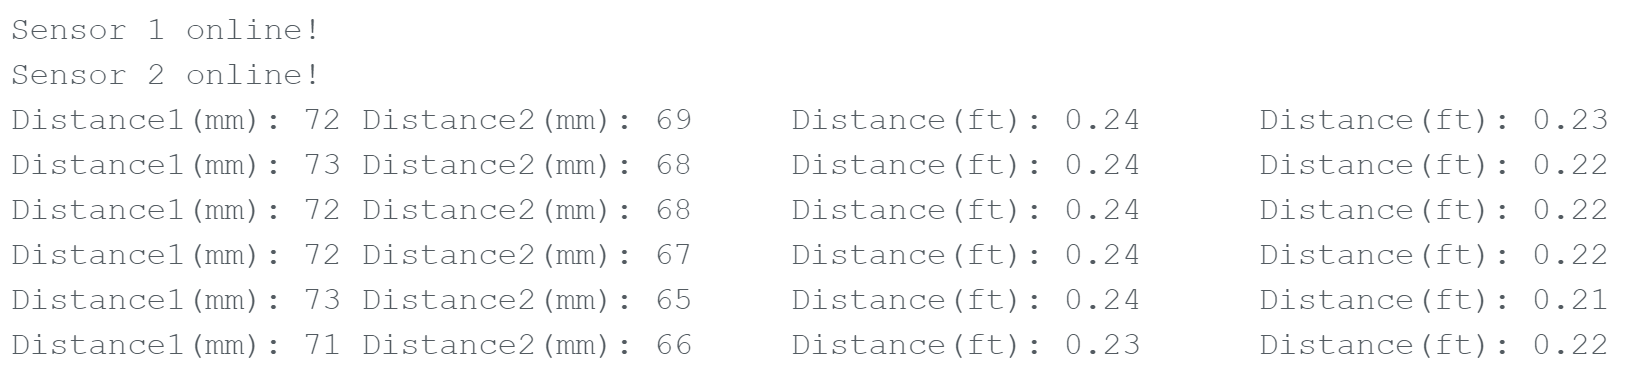
Figure 4: Screenshot showing the output of above code
ToF Sensor Modes and Data
The ToF sensor supports three distance modes: Short (1.3m), Medium (3m), and Long (4m). The default is Long mode. Since our robots move quickly, I decided to use long mode.
sensor.setDistanceModeLong(); // Set sensor to long-distance mode
Code Snippet 2: Setting ToF sensor to long-distance mode.
I tested the sensor accuracy and range by moving a platform in 10 cm increments over time.
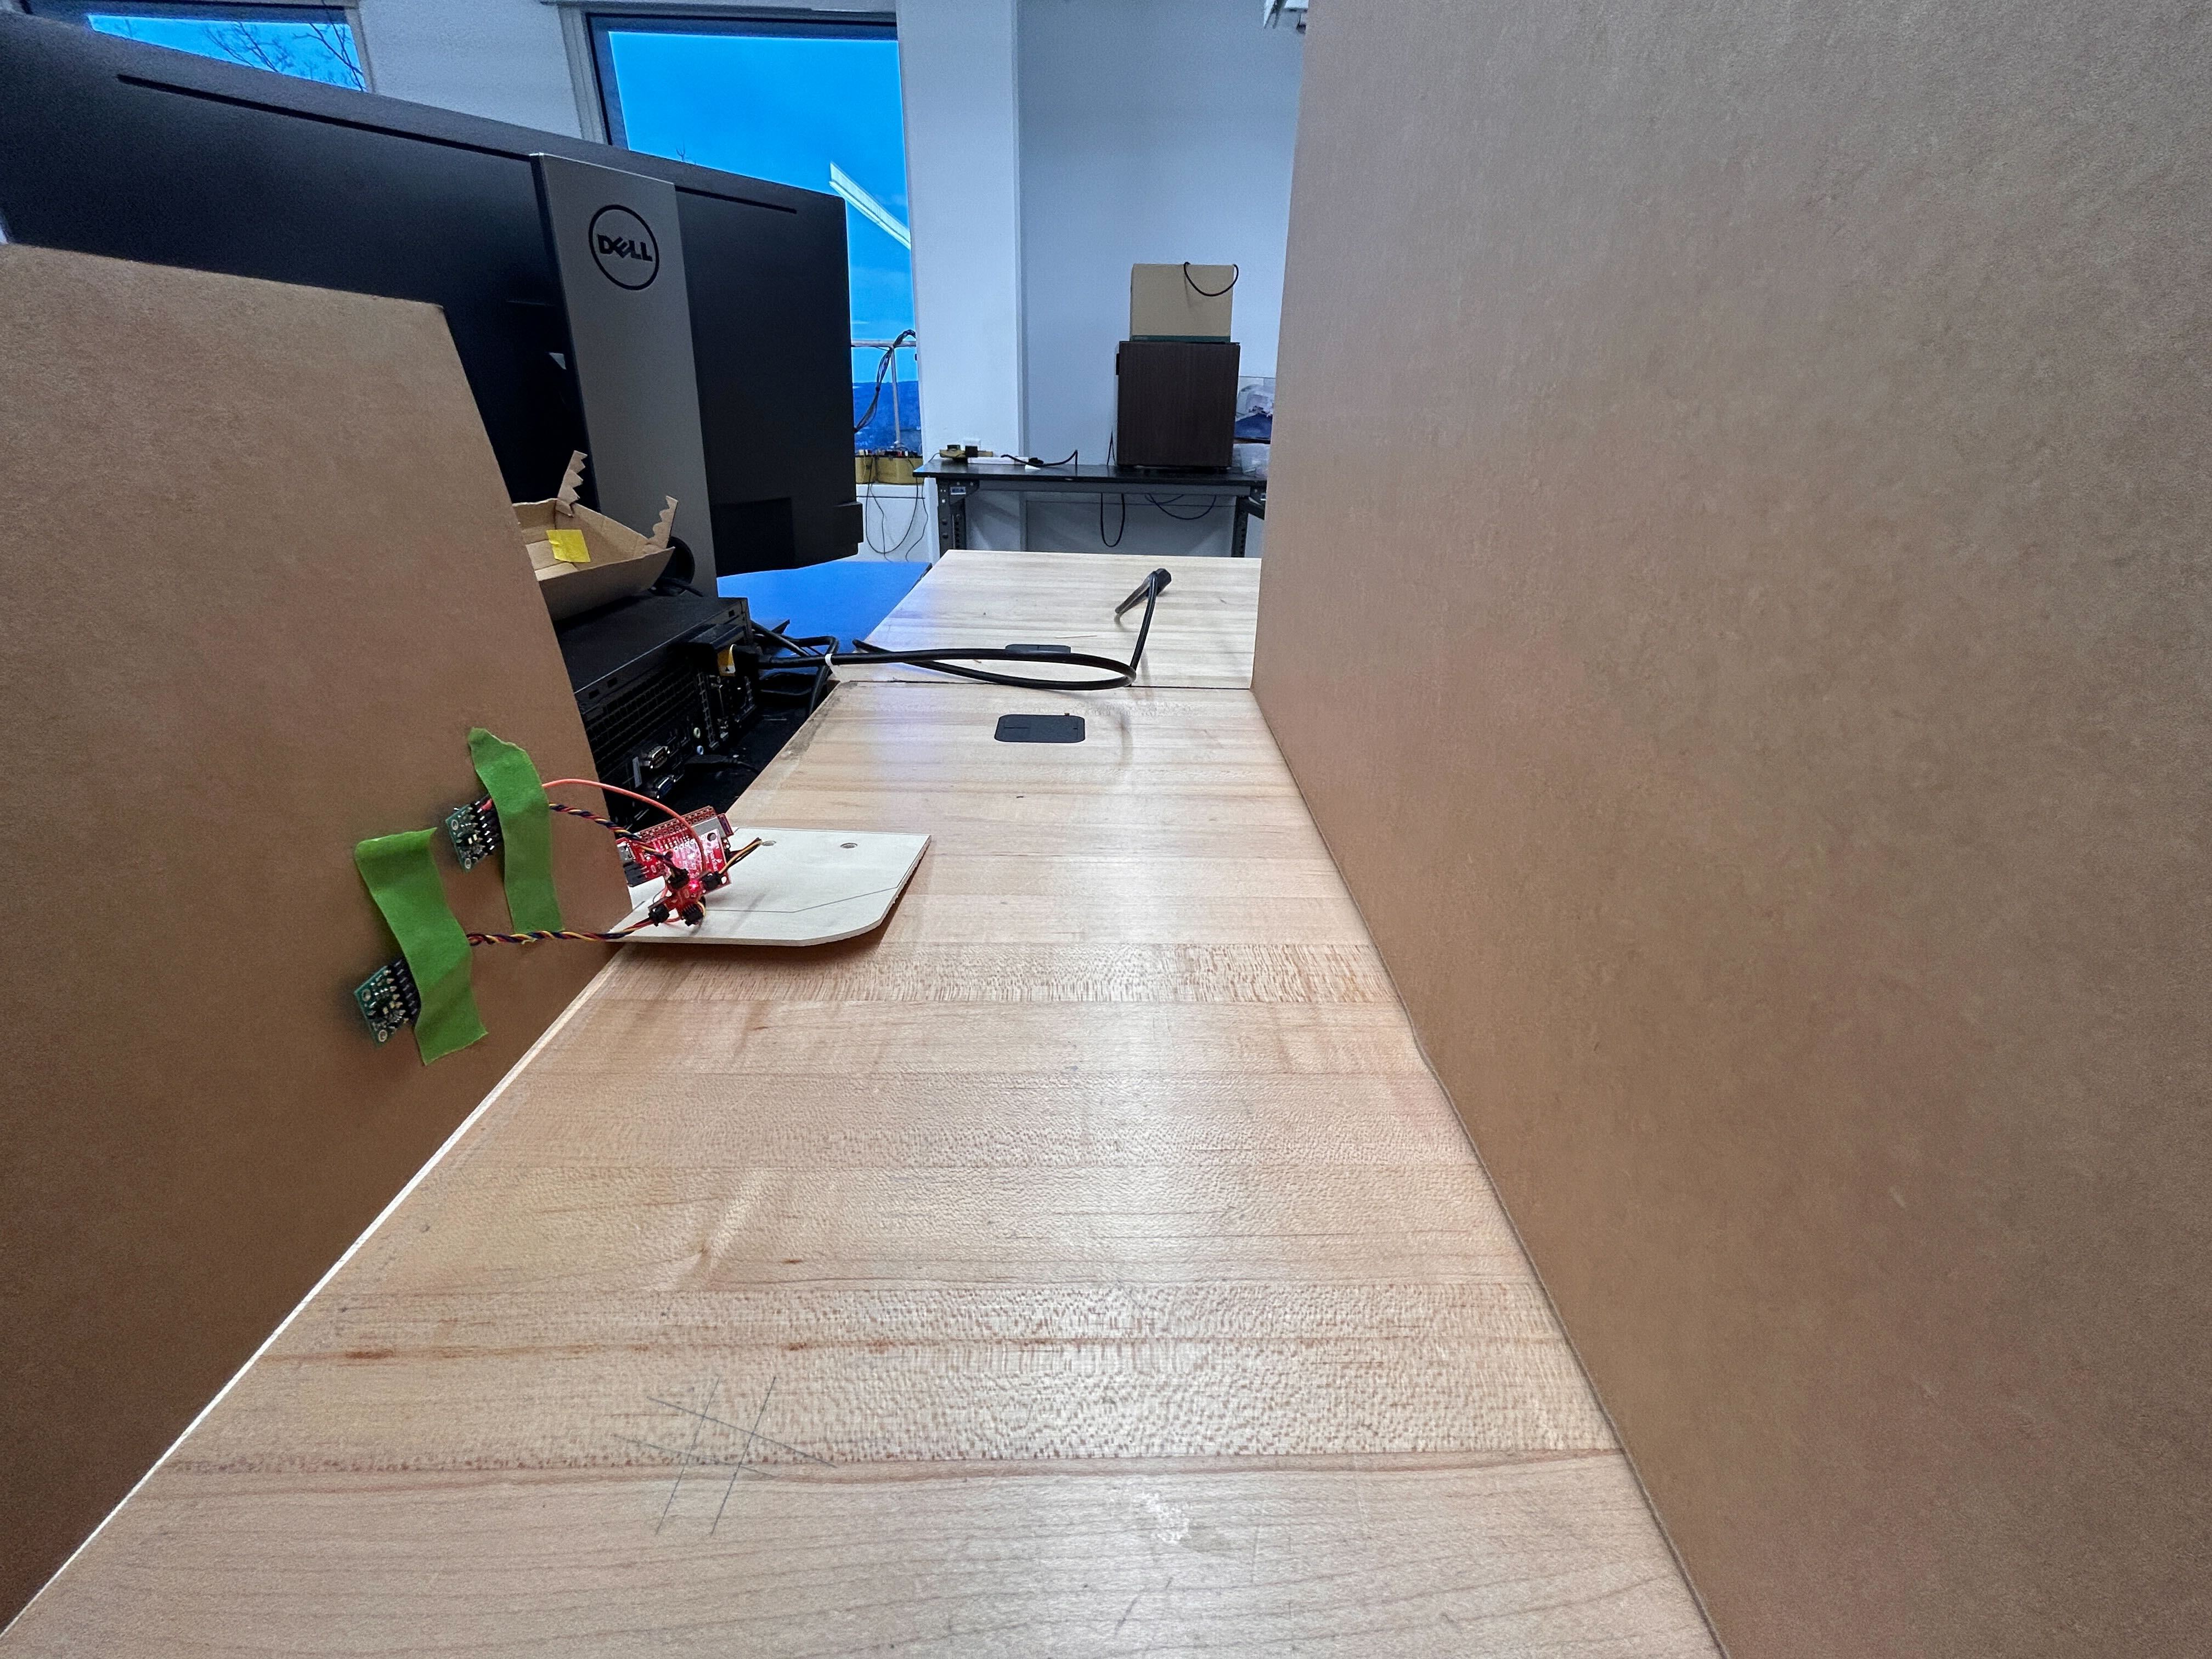
Figure 5: Data Collection Setup
        case GET_TOF_DATA:{
          // setup
          Wire.begin();
          Wire.setClock(400000);


            pinMode(SHUTDOWN_PIN, OUTPUT);
            digitalWrite(SHUTDOWN_PIN,0);

            Wire.begin();

            distanceSensor1.init();

            //Shut down first sensor, change address
            distanceSensor1.setI2CAddress(0x54);

            if (distanceSensor1.begin() != 0) //Begin returns 0 on a good init
            {
            Serial.println("First sensor failed to begin...");
            while (1)
                ;
            }
            Serial.println("Sensor 1 online!");
            delay(1000);
            digitalWrite(SHUTDOWN_PIN,1);

            if (distanceSensor2.begin() != 0)  //Begin returns 0 on a good init
            {
            Serial.println("Second sensor failed to begin...");
            while (1)
                ;
            }
            Serial.println("Sensor 2 online!");

            distanceSensor1.setDistanceModeShort();
            distanceSensor2.setDistanceModeShort();


          //data collection

          tx_estring_value.clear();
          Serial.println("Collect Data");
          // collect data
          for (int i = 0; i < cnt; i++) {
                distanceSensor1.startRanging(); //Write configuration bytes to initiate measurement
                distanceSensor2.startRanging(); //Write configuration bytes to initiate measurement

                while (!distanceSensor1.checkForDataReady())
                {
                  delay(1);
                }
                while (!distanceSensor2.checkForDataReady())
                {
                  delay(1);
                }

                distance1[i] = distanceSensor1.getDistance(); //Get the result of the measurement from the sensor
                distanceSensor1.clearInterrupt();
                distanceSensor1.stopRanging();

                distance2[i] = distanceSensor2.getDistance(); //Get the result of the measurement from the sensor
                distanceSensor2.clearInterrupt();
                distanceSensor2.stopRanging();


                time_sample[i] = (int) millis();
                // delay(1000/sampling_rate);

                Serial.println(i);

            }


          // send data
          Serial.println("Send Data");
            int jMax= sizeof(time_sample);
                for (int j = 0; j < cnt; j++) {

                    tx_estring_value.clear();
                    tx_estring_value.append(time_sample[j]);
                    tx_estring_value.append(" | ");
                    tx_estring_value.append(distance1[j]);
                    tx_estring_value.append(" | ");
                    tx_estring_value.append(distance2[j]);
                    //tx_estring_value.append(" | ");
                    tx_characteristic_string.writeValue(tx_estring_value.c_str());
                    Serial.println(j);
                  }
          }
Code Snippet 3: ToF Data Collection
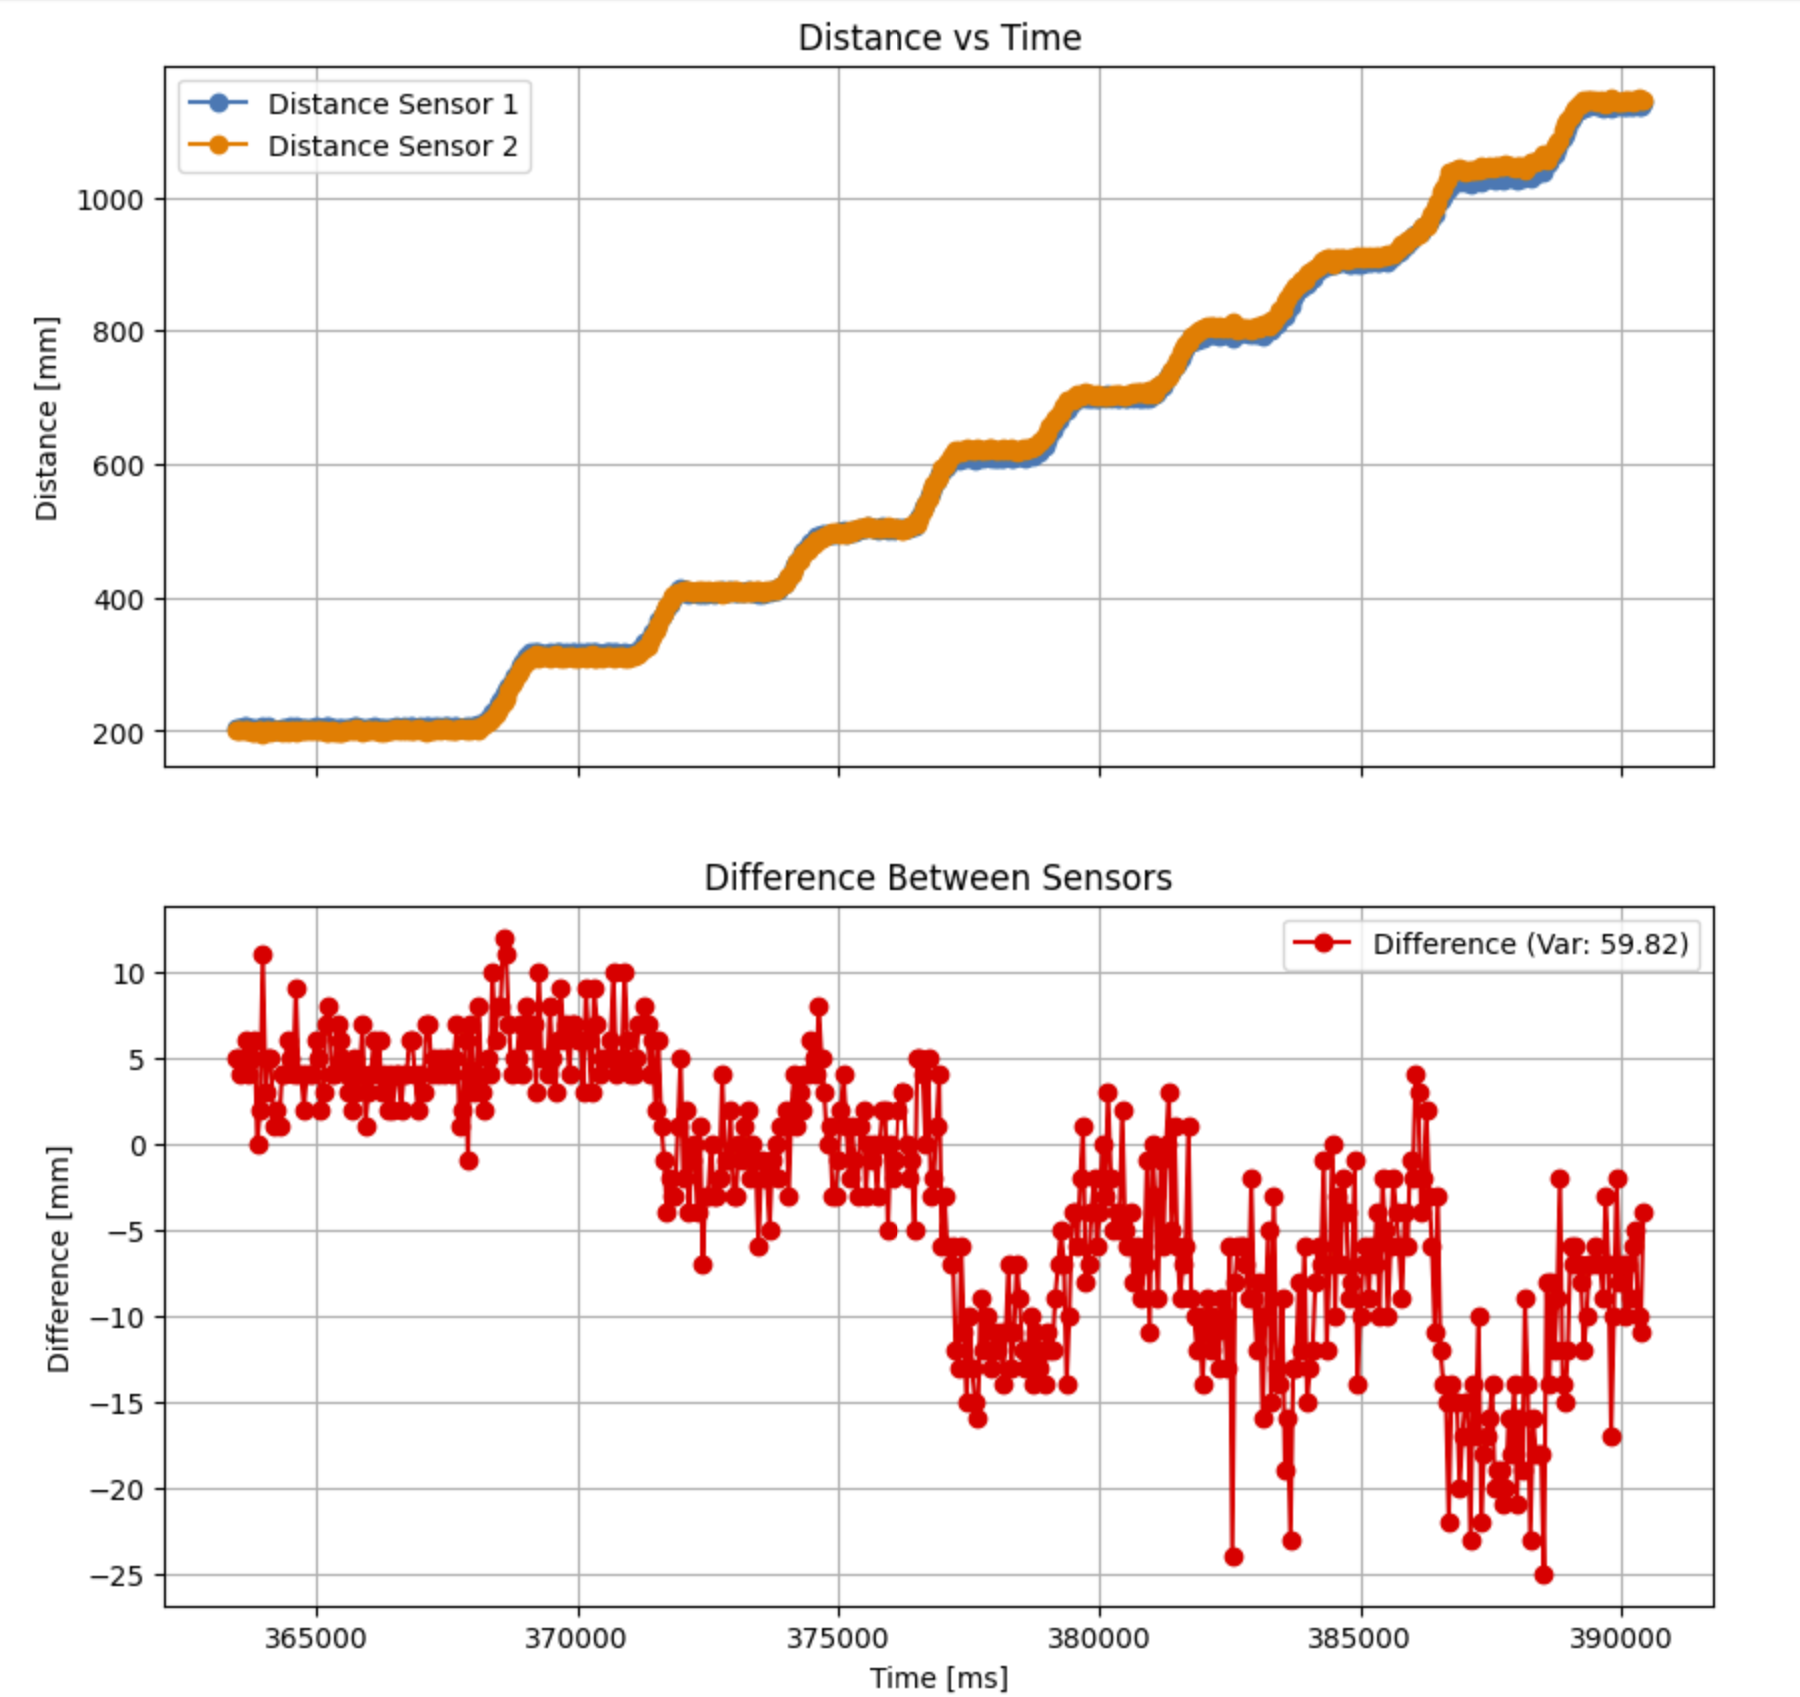
Figure 4: Distance measurements over time, showing sensor accuracy and repeatability.
Using Two ToF Sensors and IMU Simultaneously
To use both sensors I scanned for distance and then imu right after. I used to have a delay function built in for imu sensing, but that’s no longer necessary since the ToF sensors are slow.
        case GET_TOF_AND_IMU_DATA:{
           // setup
            pinMode(SHUTDOWN_PIN, OUTPUT);
            digitalWrite(SHUTDOWN_PIN,0);

            distanceSensor1.init();
            //Shut down first sensor, change address
            distanceSensor1.setI2CAddress(0x54);
            if (distanceSensor1.begin() != 0) //Begin returns 0 on a good init
            {
              Serial.println("First sensor failed to begin...");
              while (1);
            }
            Serial.println("Sensor 1 online!");
            delay(100);
            digitalWrite(SHUTDOWN_PIN,1);

            if (distanceSensor2.begin() != 0)  //Begin returns 0 on a good init
            {
              Serial.println("Second sensor failed to begin...");
              while (1);
            }
            Serial.println("Sensor 2 online!");

            distanceSensor1.setDistanceModeShort();
            distanceSensor2.setDistanceModeShort();


          //data collection

          tx_estring_value.clear();
          Serial.println("Collect Data");
          // collect data
          for (int i = 0; i < cnt; i++) {
                distanceSensor1.startRanging(); //Write configuration bytes to initiate measurement
                distanceSensor2.startRanging(); //Write configuration bytes to initiate measurement

                while (!distanceSensor1.checkForDataReady())
                {
                  delay(1);

                }
                while (!distanceSensor2.checkForDataReady())
                {
                  delay(1);
                }

                distance1[i] = distanceSensor1.getDistance(); //Get the result of the measurement from the sensor
                Serial.println("distance 1 collected");

                distanceSensor1.clearInterrupt();
                distanceSensor1.stopRanging();

                distance2[i] = distanceSensor2.getDistance(); //Get the result of the measurement from the sensor
                Serial.println("distance 2 collected");

                distanceSensor2.clearInterrupt();
                distanceSensor2.stopRanging();


                // collect imu data +
                myICM.getAGMT();
                Serial.println("get AGMT");

                pitch_data_raw[i] = atan2(myICM.accY(),myICM.accZ())*180/M_PI;
                roll_data_raw[i] = -atan2(myICM.accX(),myICM.accZ())*180/M_PI;
                Serial.println("got pitch roll");

                  dt = (millis()-last_time)/1000.;
                  last_time = millis();
                   Serial.println("got time");


                yaw_data_raw[i] = atan2(myICM.magX(),myICM.magY())*180/M_PI;
                Serial.println("get yaw");

                // Low pass filter alpha deined in glob var (start at 0.2)
                pitch_data[i] = alpha * pitch_data_raw[i] + (1 - alpha) * pitch_data[i];
                roll_data[i] = alpha * roll_data_raw[i] + (1 - alpha) * roll_data[i];

                pitch_data_raw_g[i] = pitch_data_raw_g[i] + myICM.gyrX()*dt;
                roll_data_raw_g[i] = (roll_data_raw_g[i] + myICM.gyrY()*dt);

                pitch_data_comp[i] = (1-weight)* (pitch_data_raw_g[i]) + (weight)* pitch_data[i]  ;
                roll_data_comp[i] = (1-weight)* (roll_data_raw_g[i]) + (weight)* roll_data[i]  ;
                Serial.println("get comp");

                time_sample[i] = (int) millis();
                Serial.println("get time");
                Serial.println(i);


            }


          // send data
          Serial.println("Send Data");
                for (int j = 0; j < cnt; j++) {

                    tx_estring_value.clear();
                    tx_estring_value.append(time_sample[j]);
                    tx_estring_value.append(" | ");
                    tx_estring_value.append(yaw_data_raw[j]);
                    tx_estring_value.append(" | ");
                    tx_estring_value.append(pitch_data_comp[j]);
                    tx_estring_value.append(" | ");
                    tx_estring_value.append(roll_data_comp[j]);
                    tx_estring_value.append(" | ");
                    tx_estring_value.append(distance1[j]);
                    tx_estring_value.append(" | ");
                    tx_estring_value.append(distance2[j]);

                    //tx_estring_value.append(" | ");
                    tx_characteristic_string.writeValue(tx_estring_value.c_str());
                    Serial.println(j);
                  }
          }
Code Snippet 3: Code to read ToF and IMU data
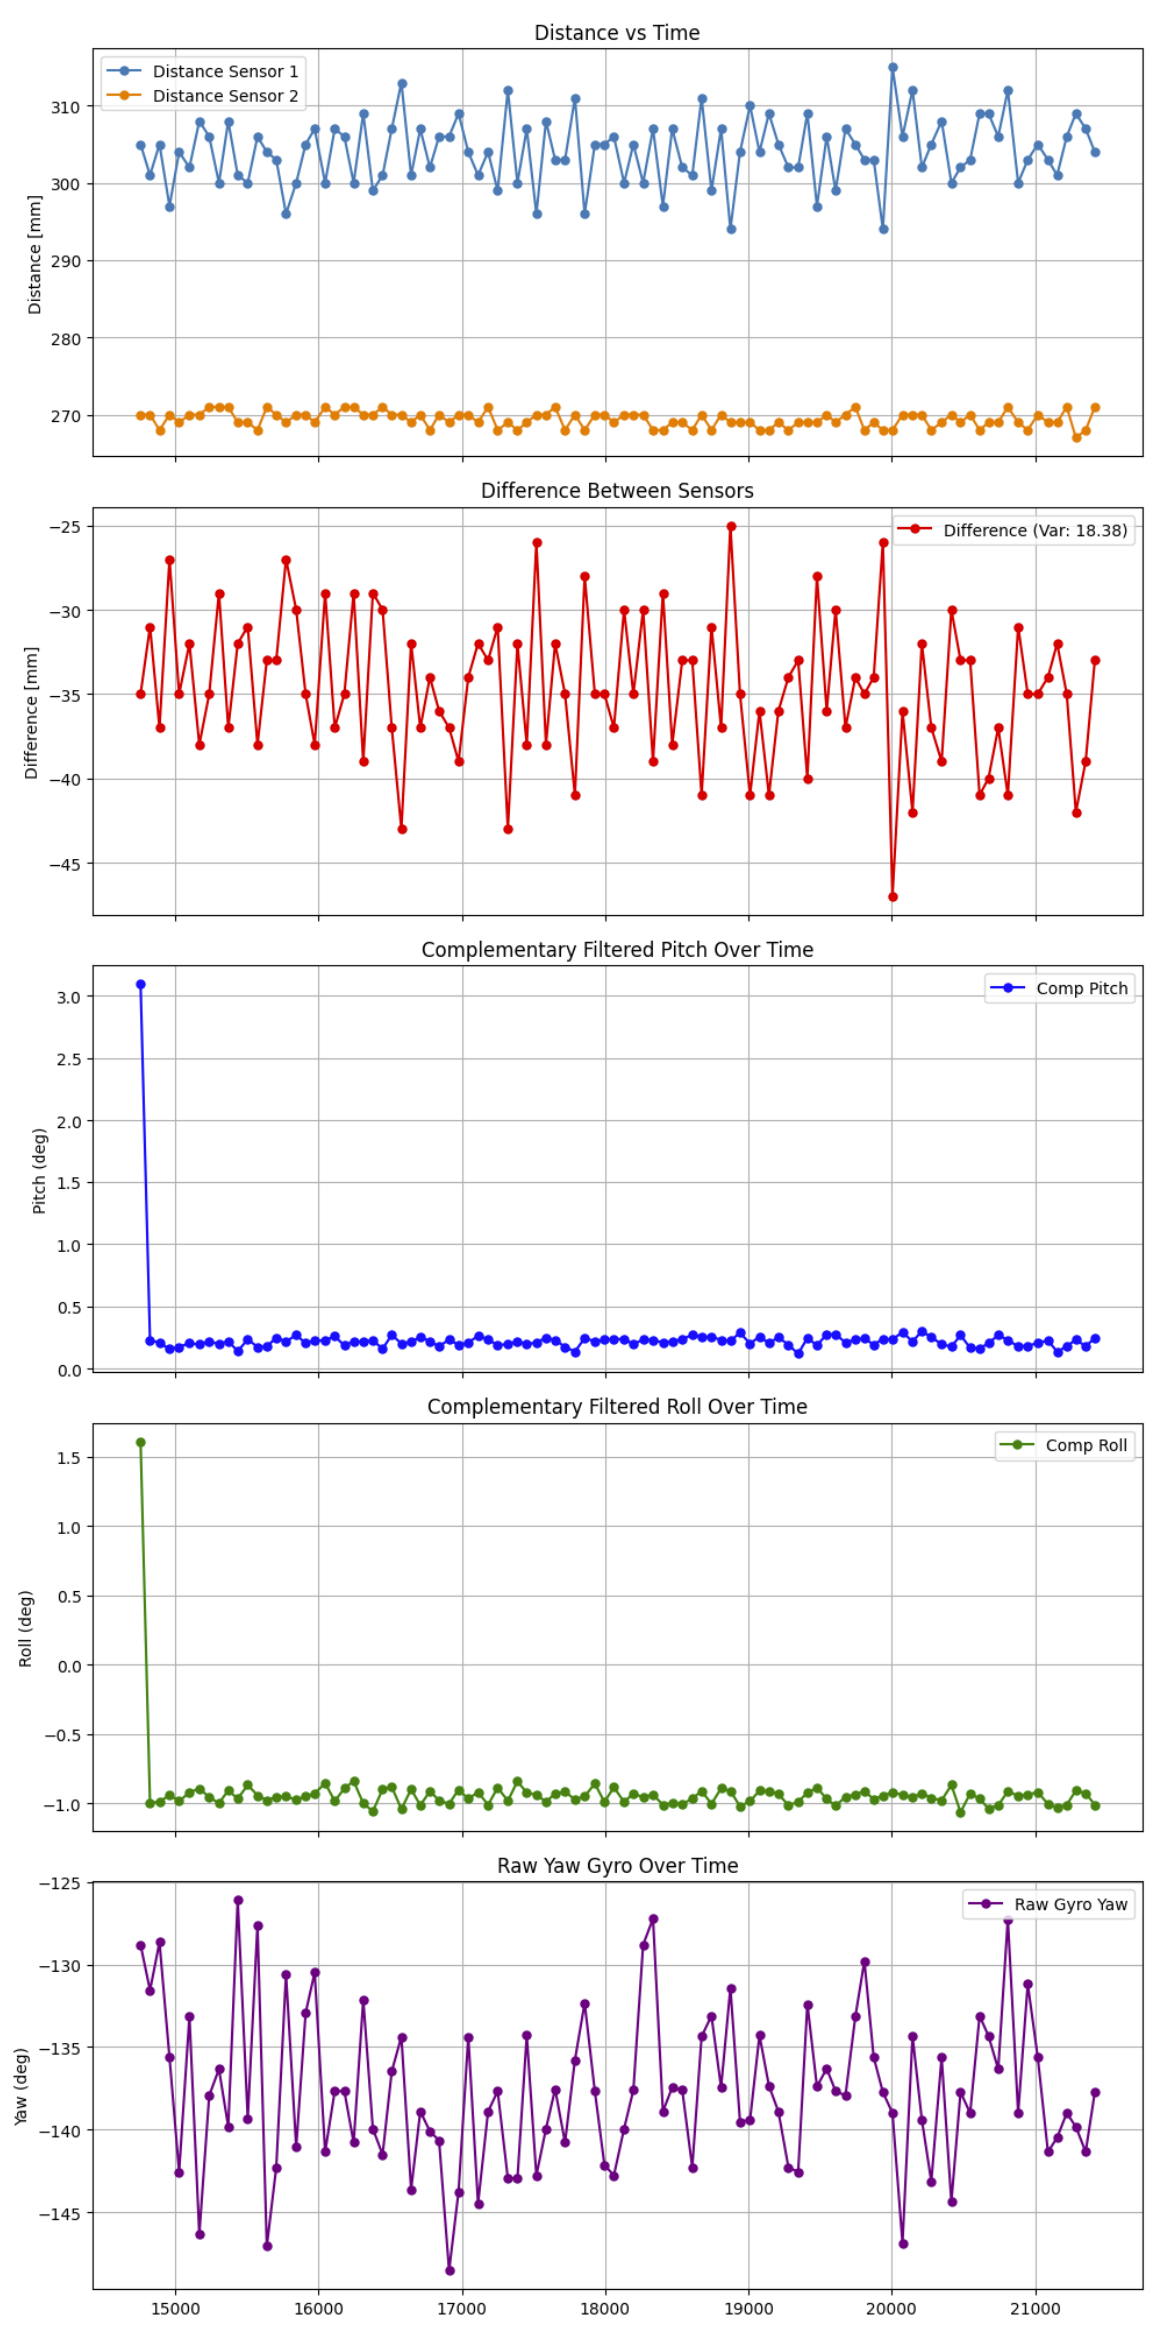
Figure 5: Distance measurements and IMU measurements over time
Measuring Execution Speed and Limiting Factor
To determine the execution speed, I measured timing between sensor readings and grouped them into buckets.
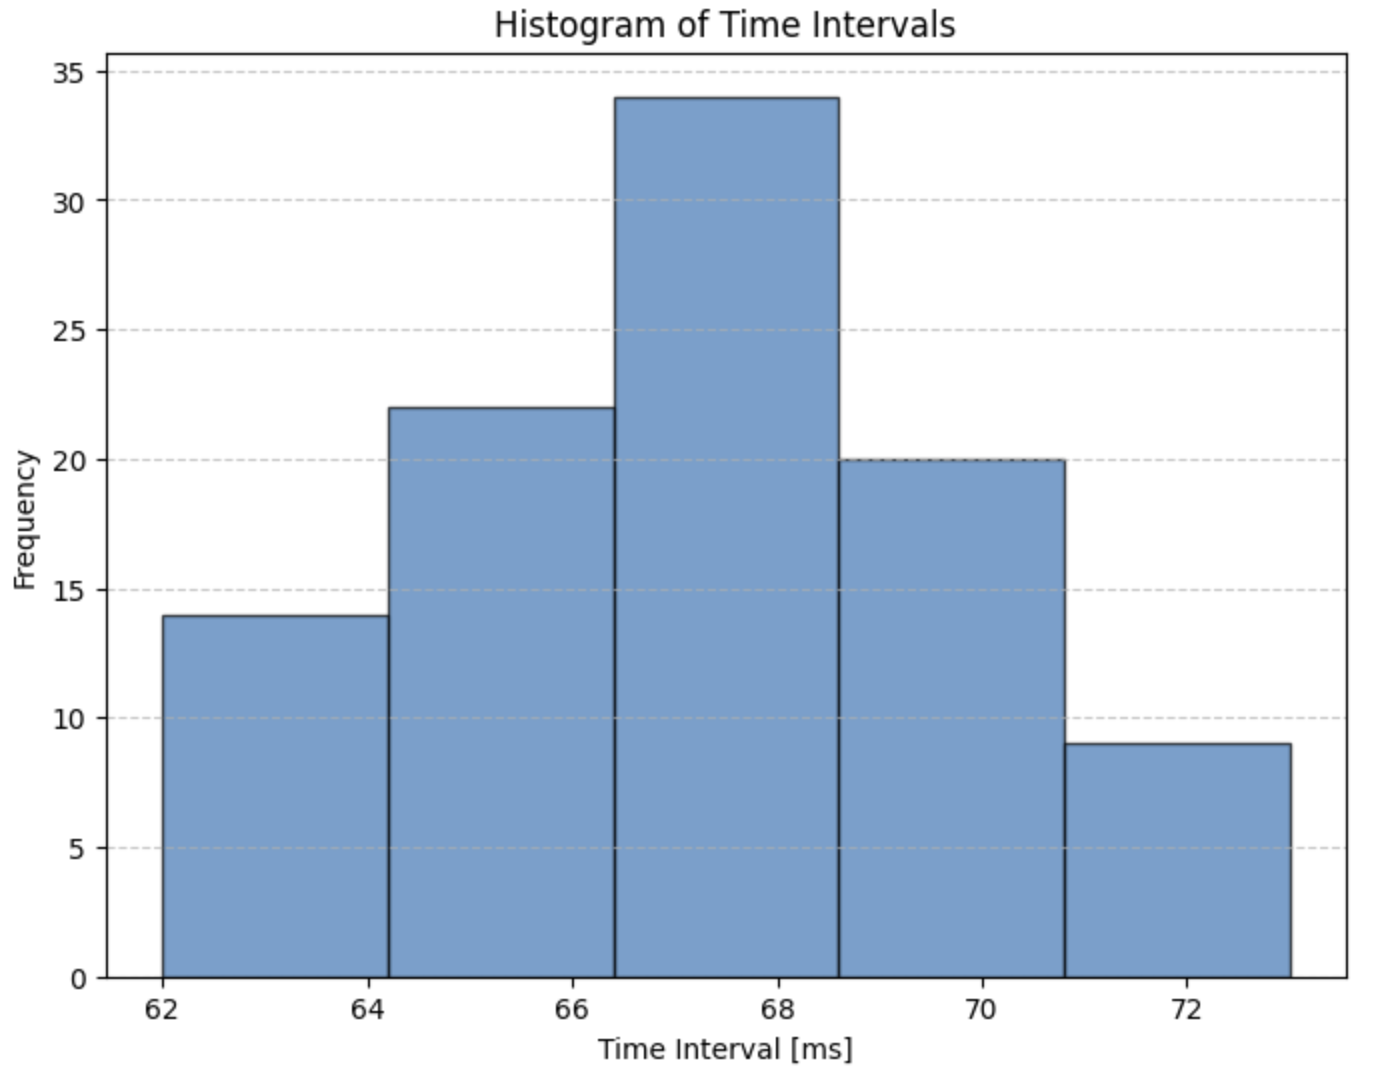
Figure 6: Timing Histogram for base IMU and TOF code
I’m going to try optimizing the code by removing my debugging statements and lowering the intermeasurement period. Based on the library examples and documentation, it seems like 20ms is the minimum and 100ms is the default.
  distanceSensor1.setIntermeasurementPeriod(20);
  distanceSensor2.setIntermeasurementPeriod(20);
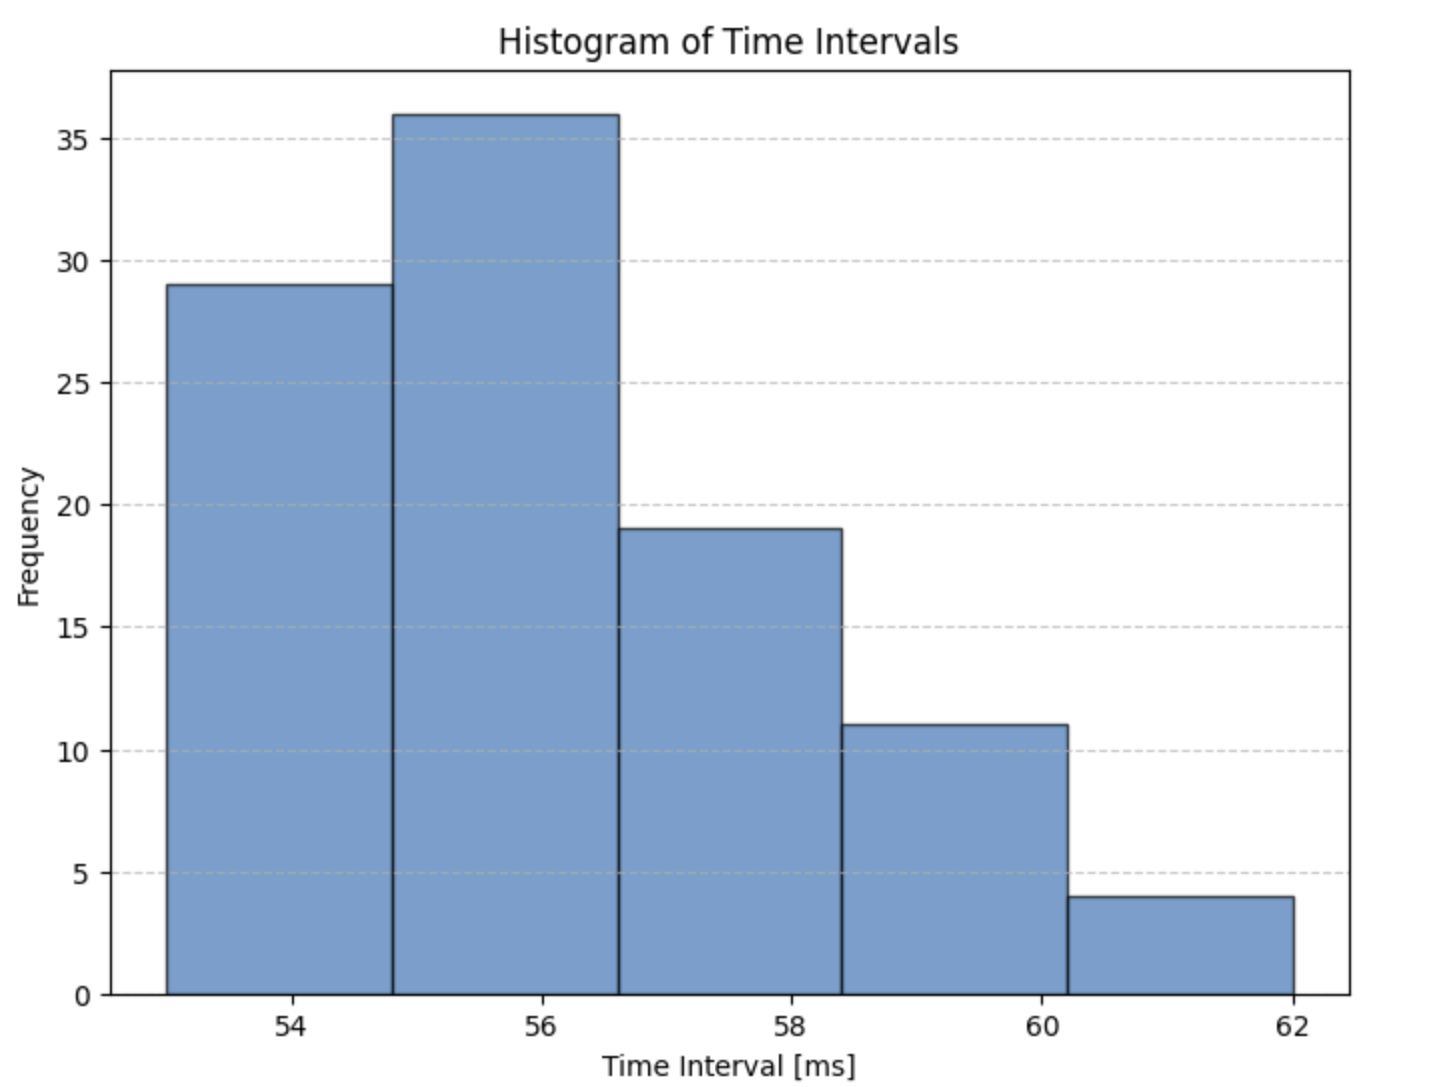
Figure 6: Timing Histogram for Optimized IMU and TOF code
While the optmiized code noticibly improved performance, I wonder if I can do better. I suspect that the sensors are waiting their intermeasurement periods in series rather than in parallel. If this is the case, I could hopefully reduce sensing time by ~50%. I will look into this further
Additional Discussion (5000-Level Tasks)
Infrared-Based Distance Sensors
Infrared-based distance sensors determine distance by emitting IR waves and detecting reflections. Traditional IR sensors use triangulation, measuring reflection angles for short-range applications. ToF sensors, in contrast, measure laser pulse timing for greater accuracy, making them ideal for robotics and gesture recognition. LiDAR, another IR-based technology, offers even higher precision for mapping and autonomous navigation but is significantly more expensive.
| Sensor Type | Range | Speed | Environmental Sensitivity | Price |
|---|---|---|---|---|
| VL53L1X (ToF) | 4m | Fast | Affected by reflectivity | $5 - $10 |
| IR Reflective | 10cm | Fast | Affected by surface color | $1 - $5 |
| LiDAR | 100m+ | Fast | Affected by fog and rain | $100+ |
Table 1: Comparison of different infrared-based distance sensors.
Each sensor type varies in precision, cost, and environmental suitability, making them ideal for different applications.
Sensitivity to Colors and Textures
To test color and texture sensitivity, I measured distances to different surfaces. A piece of cardboard, a semi-reflective metal weight, and a soft cloth. I measured them all ~500mm away from the sensors and cycled cardboard>metal>cloth>cardboard.
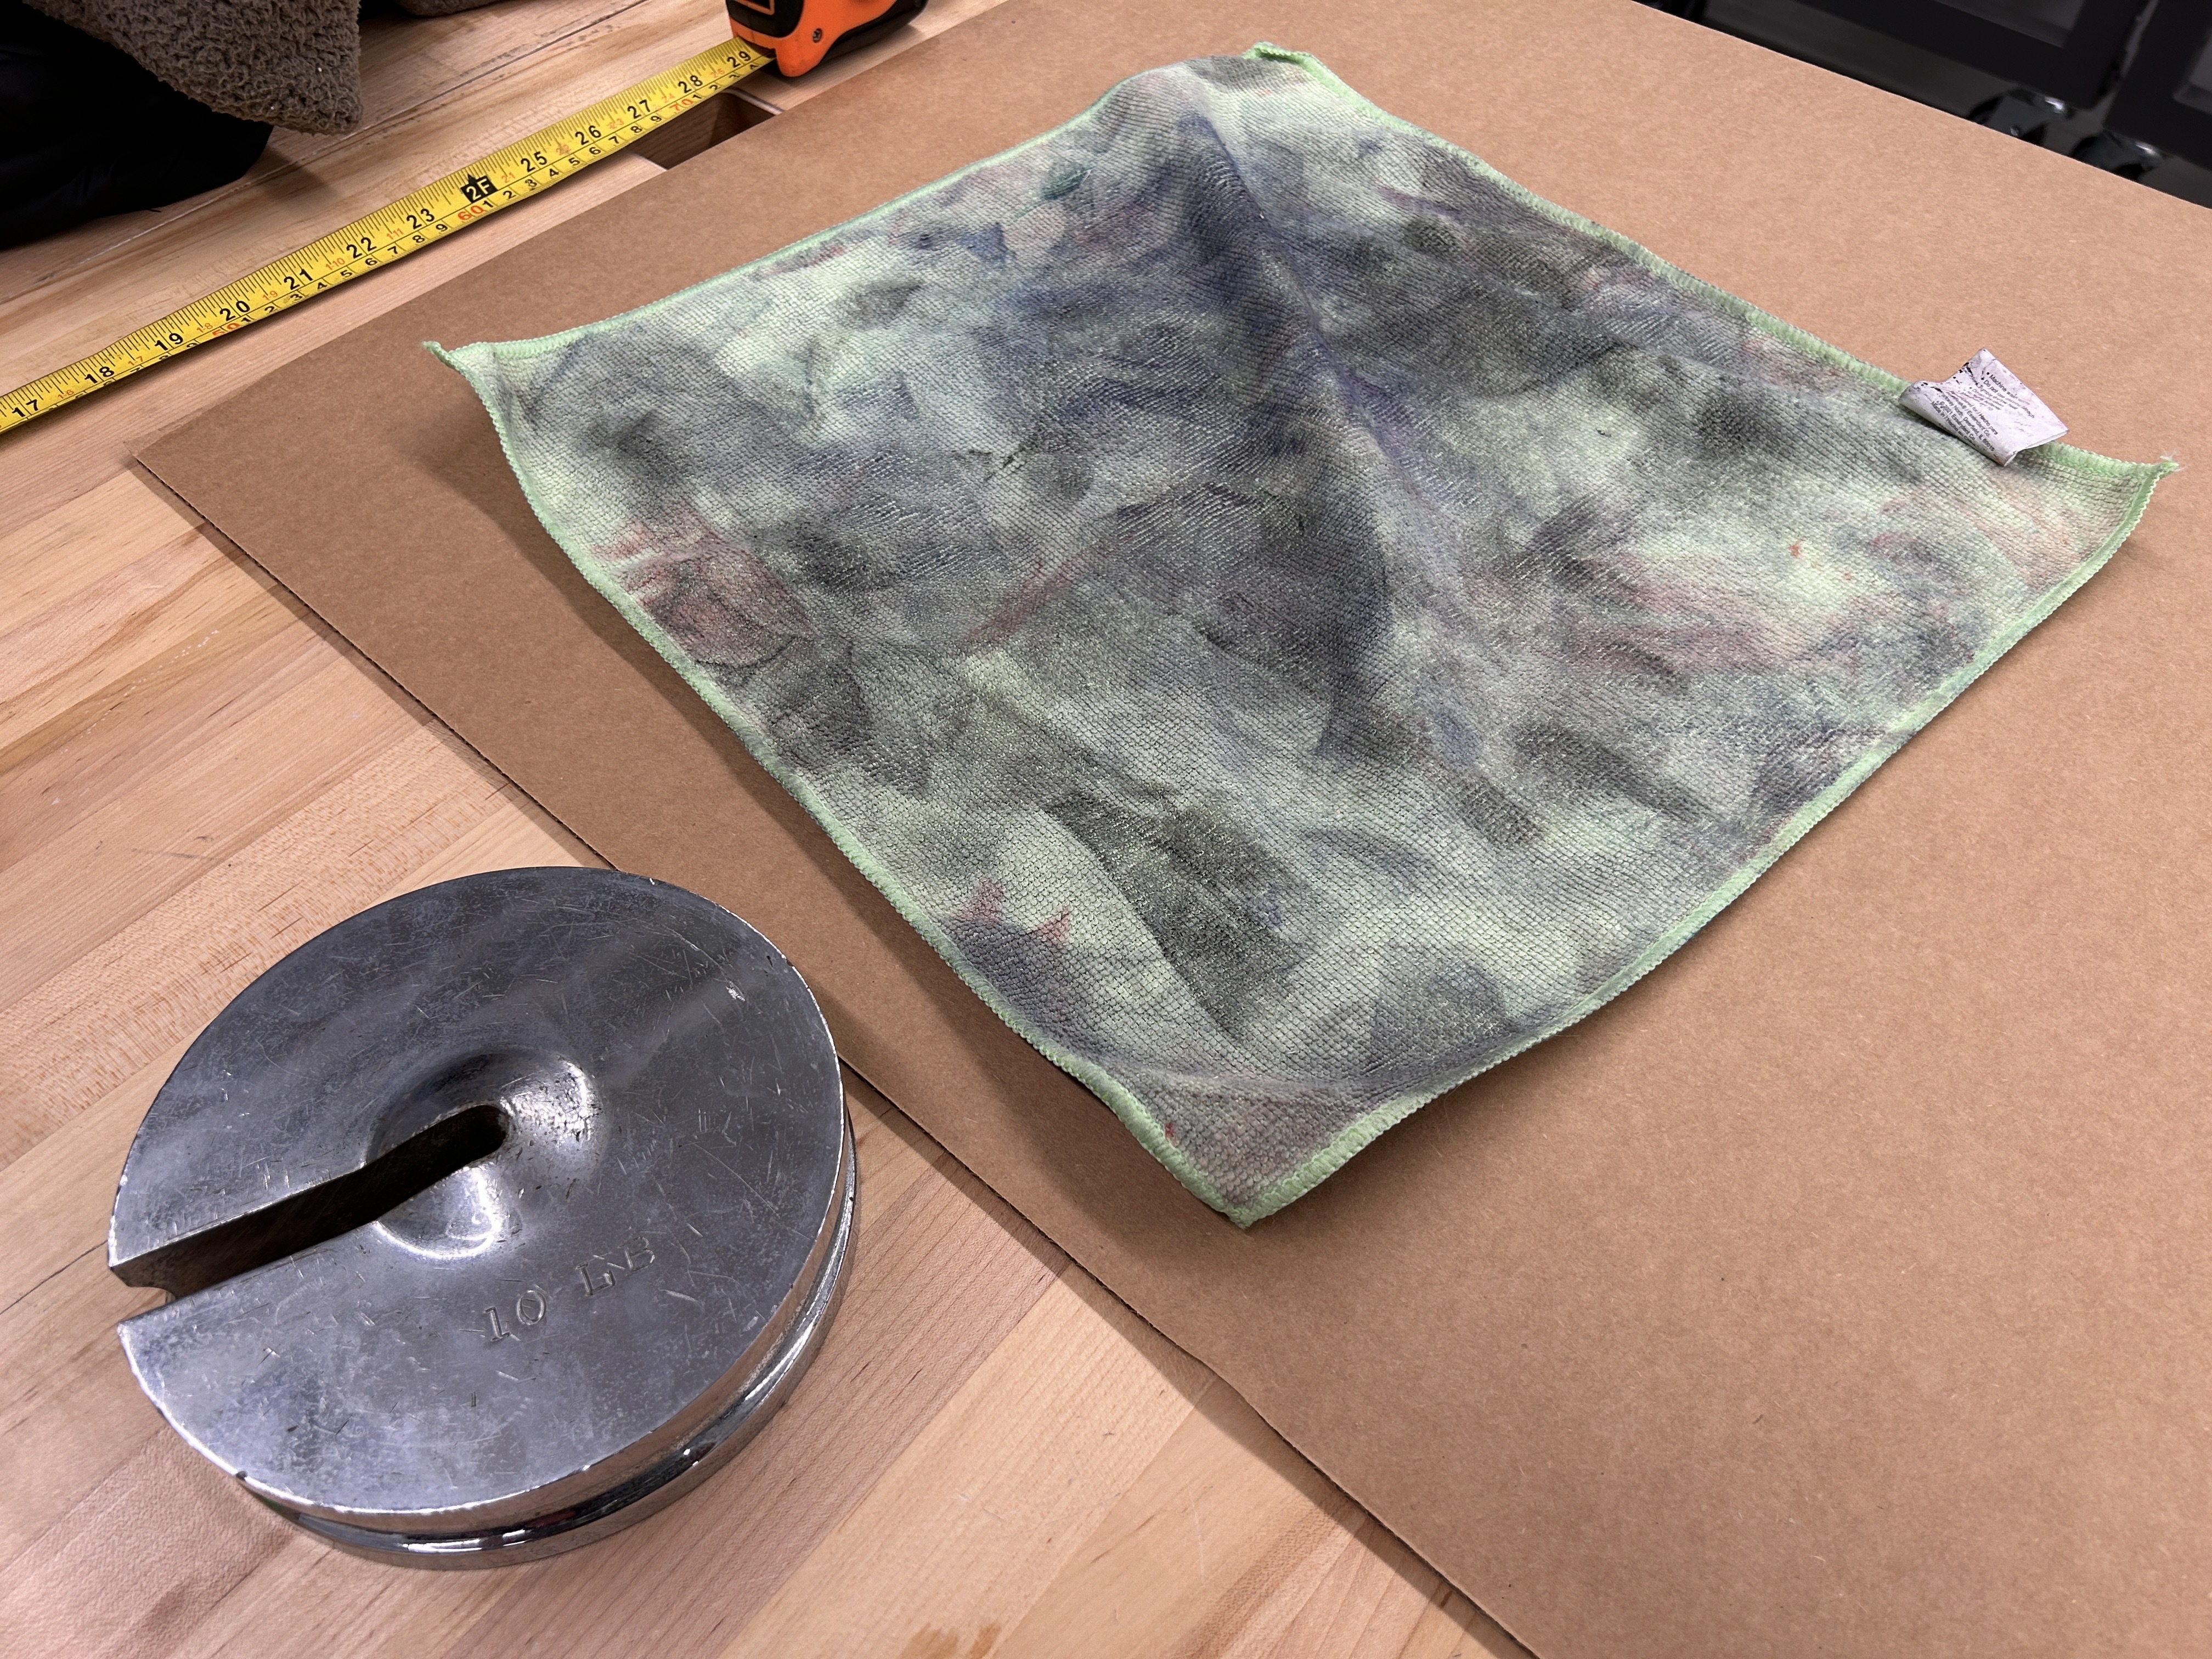
Figure 7: Test Items
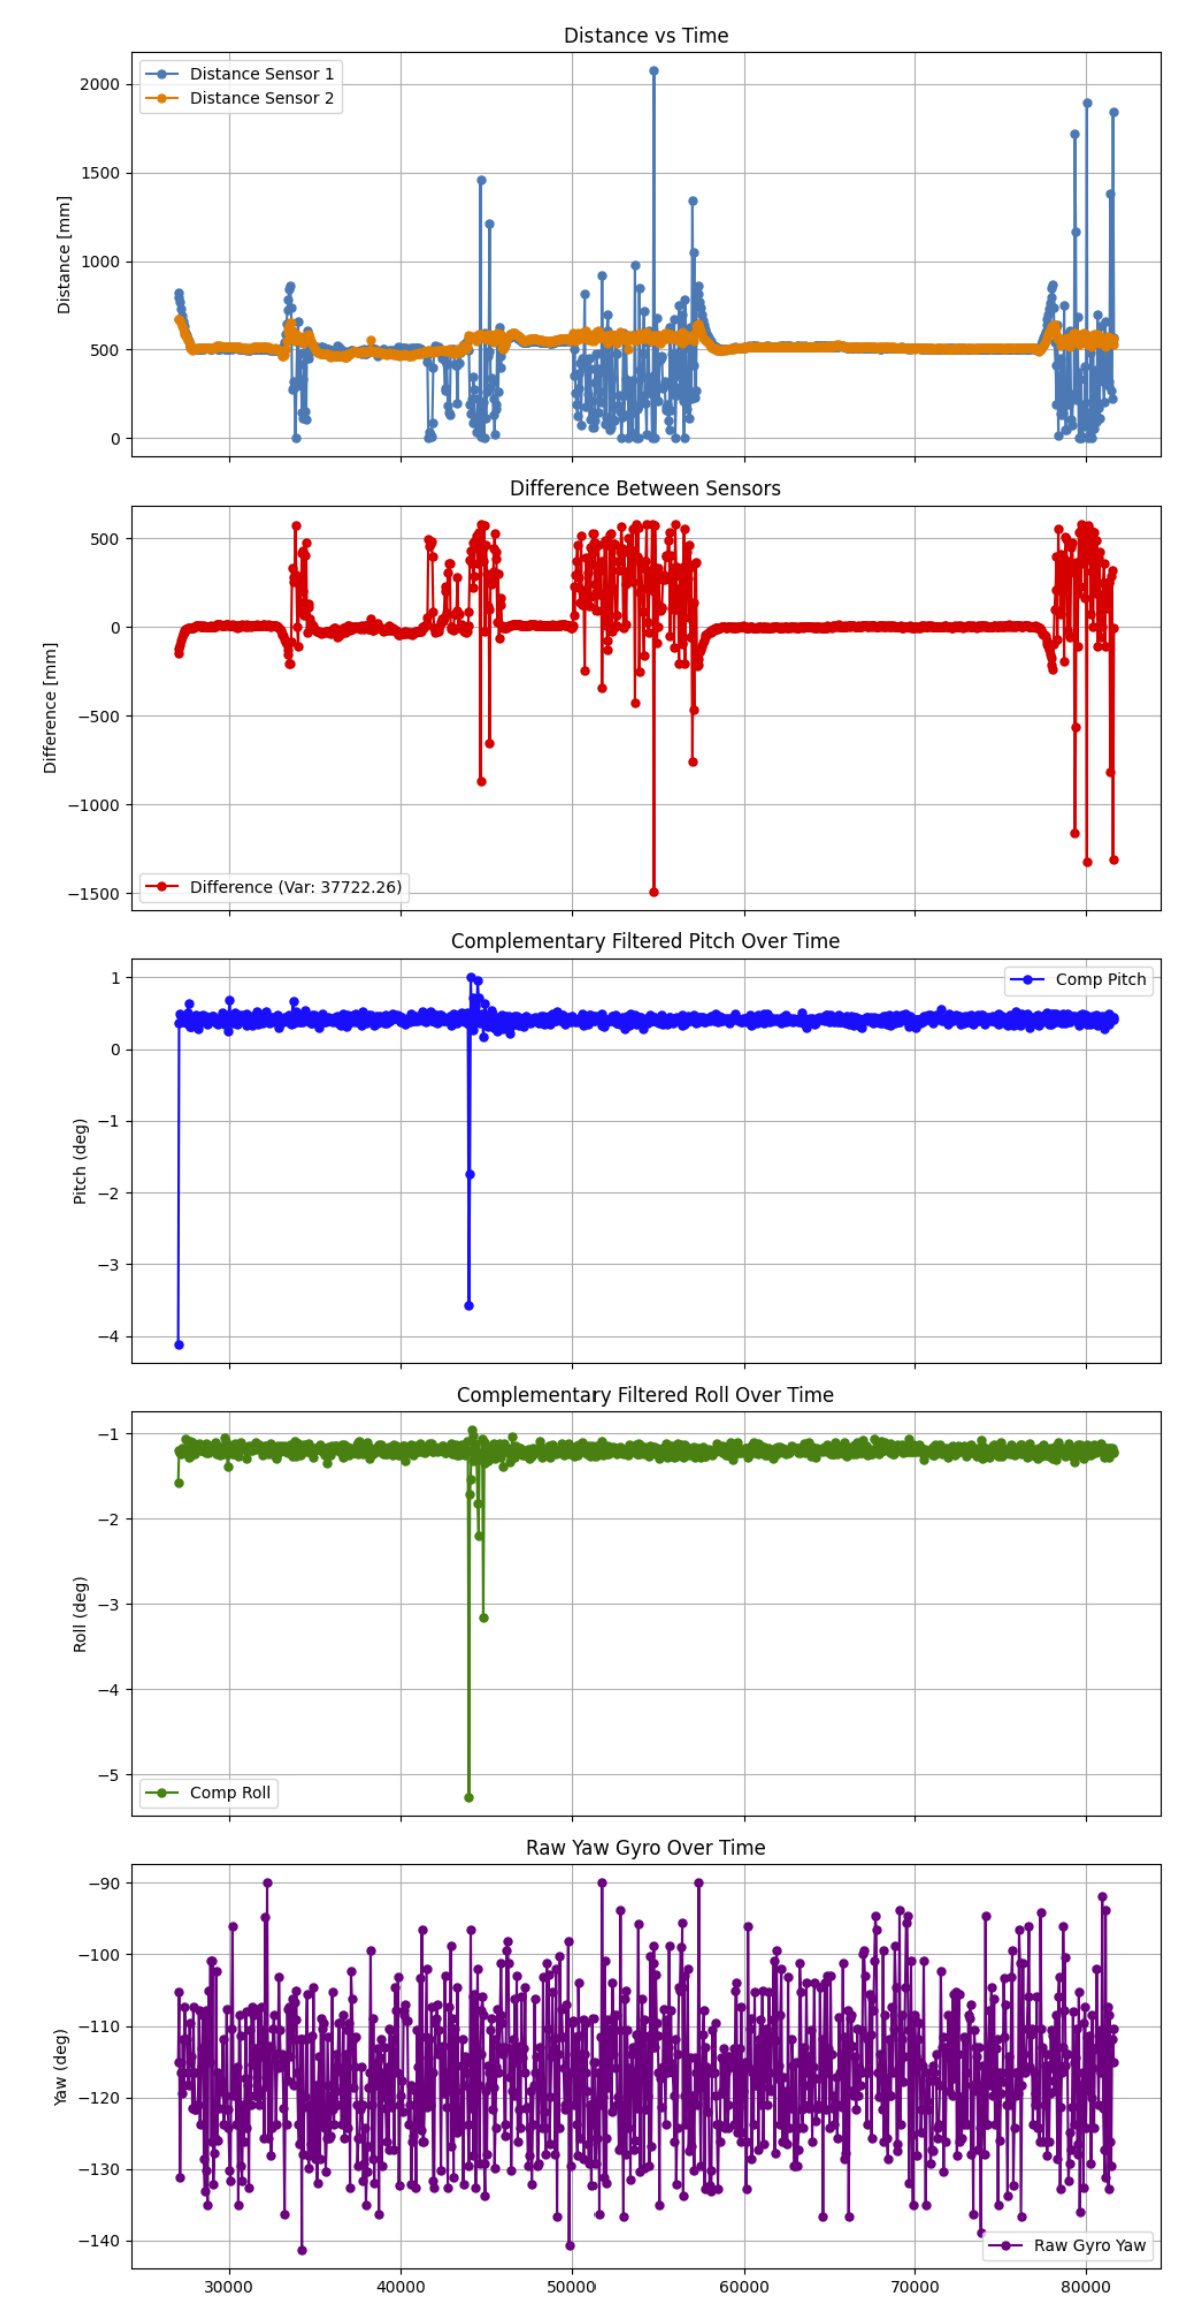
Figure 7: Test Results
Results show that semi-reflective surfaces and soft surfaces didn’t actually impact the distance sensors too much. This was very surprising to me.
I wanted to also test how to sensor reacts to hot surfaces using a blowtorch. Responsible student Kelvin Resch dissuaded me from this experiment. He is a paragon of responsible action and is a model student.